Pages

Tuesday, April 30, 2013

Review {Covergirl Outlast Stay Fabulous 3 in 1 Foundation}

Good morning all!

I was recently given the opportunity through BzzAgent to review Covergirl Outlast Stay Fabulous 3 in 1 Foundation. I love make-up and always have, so I jumped at the opportunity to try something new. The lovely folks at BzzAgent sent me a coupon to redeem vs. sending me the product, so off to my local drugstore I went.


I'm a pretty fair person. Skinwise and otherwise, I suppose, ha. My mother-in-law lovingly calls me "porcelain doll" Imagine my surprise when I got to the section of this makeup and my color was NOT the lightest shade. I ended up with #810 Classic Ivory. There was one more number (805, I believe) behind mine, so if you are ultra fair, perhaps this foundation would interest you. I also grabbed 810 because I figured I'd be getting a little sun this summer.


So, the first impressions: I was very impressed with how easily this foundation went on. Sometimes with other brands, I feel like I am having to drag it across my face, and this went on very smooth. Another thing that I was very impressed with is that it went on evenly! It didn't streak because it doesn't dry the second it's out of the bottle, so it gives you a little time to blend for a streak-free finish, and it didn't leave obvious blobs of color on my face. 


Can we touch on how awkward selfies are? I realized about ten seconds after I agreed to do the review that a makeup review usually includes faces. So let's make some awkward ones, shall we?

What's over there?

And what's over there??

I applied the makeup on one side of my face and left the other bare so I could examine if there was any difference. The top photo is the makeup-less side... and the bottom has the makeup! Pretty big difference eh?

The "3-in-1" makes a big difference. The makeup is primer, foundation AND concealer... so all three steps in one. Which makes a big difference for me. I tend to be a bit lazy when it comes to my face... a dab of foundation and usually I don't want to work on it any farther. So all three steps in one? PLUS SPF 20? PLUS shine free? Sign me up.

My only "con" so-to-say is the price - the price of my bottle was $12.75 (and other BzzAgents saw it for 13.99), and I have to admit I'm a bit cheap when it comes to makeup. But, I realize that purchasing primer, foundation, and concealer separately would be MUCH more than $12-13 dollars, so I will most likely purchase this product again because it'll save me money in the long run. I must say that I'm impressed!

So what about you? Have you found any makeup recently that's really impressed you? Tell me about it! 


(Disclaimer - I was sent a coupon for a full sized bottle of COVERGIRL Outlast Stay Fabulous 3 in 1 Foundation for my review from BzzAgent.com. I was not compensated in any other way to give a negative or positive review of this product and was allowed to keep the product.)


Friday, April 26, 2013

It's Pinspired Friday! {Sweet Potato Shepherd's Pie}

Happy Friday all! It's Pinspired Friday!


Let's talk about healthy dinners today. Dinners are one of those things that can be completely based on mood. You know what is nice sometimes? Getting your cooking out of the way so that tomorrow, you can reheat and still have an awesome meal that doesn't taste reheated. In fact, I completely recommend that you make this one a day before you want to eat it and then don't touch it until tomorrow. It's kind of like a pan of lasgana - better the next day, as it gives all of the flavors time to settle and come together (or so they tell me, I hate lasgana. haha!) But really. Make this one today and eat it tomorrow. When it comes time to figure out what to make tomorrow for dinner... you'll thank me. ;)

It all started when I ran across this recipe from Skinnytaste.com.

http://www.skinnytaste.com/2012/11/sweet-potato-turkey-shepards-pie.html
I was able to modify her original recipe to get rid of all of the dairy, and also to modify it more with what I usually have in the pantry and freezer (I can't say I ever have parsnips!), and it still tastes great!

So let's gather our ingredients. This will make plenty for two people.

• 2 small sweet potatoes/yams
• 3 tablespoons of minced garlic - I use the kind that is in a jar, it saves a bit of time.
• 1 3/4 cup of chicken broth
• 1 lb of ground turkey
• 1 tsp of olive oil
• Onion powder
• 10 oz of mixed vegetables. I use the green bean, corn, carrot, and pea mix from Meijer.
• 2 tbsp of flour
• 1 tsp Worcestershire sauce
• 1/4 tsp rosemary
• Salt and Pepper to taste
• Optional: paprika


Preheat your oven to 400.

Get a pot of salted water going until boiling, you'll want enough water to completely cover your sweet potato chunks. Add 1/4 cup of chicken broth to the water and 1 1/2 tablespoons of minced garlic. Peel and chop your sweet potatoes, and add the sweet potatoes to the boiling water. Cook until soft, about 20-25 minutes. Drain and mash. Sprinkle a little salt and pepper over your sweet potato mash, set aside. I usually mash right in the colander and let it sit in there until it's needed again.

This is the garlic I use!

In the same pan you used for the sweet potatoes, cook your ground turkey until browned, season with salt and pepper. Once cooked, drain and set aside on plate.


In that same pot, add your olive oil and saute the remaining 1 1/2 tablespoon of minced garlic with a generous amount of onion powder. Saute for a few minutes, until some garlic pieces brown. Add your flour, salt and pepper (yes, this recipe takes quite a bit of both), remaining 1 1/2 cup of chicken broth, Worcestershire sauce, and rosemary. Mix well. Add your frozen vegetables and cooked turkey, mix. Let simmer for 5-7 minutes.


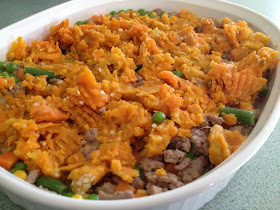
While the mixture is simmering, spray a 2.5L glass dish with cooking spray or oil of your choice. After the mixture has simmered, add the mixture to the bottom of the dish, and top it with the sweet potatoes.


You can add paprika here if you want, but I leave it out. Bake for 15 minutes. Let it cool for 10 minutes or so, then put tinfoil on top of the entire pan and put it in the refrigerator. Enjoy... tomorrow! :) You can eat it the same day, but I prefer the taste the next day.


I hope you enjoyed this recipe! :) It's nice to be able to modify something to your tastes and what you have in your pantry, AND have it taste great.


Share it with your friends! Thank you for following along and have a great weekend!


Monday, April 22, 2013

Review {Clear Scalp & Hair Therapy}

Things that are awesome:
One sample.

Things that are even more awesome:


SEVEN SAMPLES! I know... crazy town. I received the box in the mail, wondered why it was a bazillion pounds (close, more like a half pound), proceeded to open it completely wrong ("Oh, that's where the directions are"), and was pretty stoked.

I decided to take the 7 day scalp & hair challenge through Clear Hair Care. They believe that feeding the scalp is where healthier, stronger hair starts - and it makes sense. Your hair grows from your scalp (The More You Know), so if your scalp is in awesome condition, it would make sense that the hair growing from it should be more healthy than if your scalp is in poor condition.

The company sent me the "Total Care" shampoo, which is supposed to be good for all types of hair. I have pretty dry, sometimes frizzy hair, so I was skeptical that my mane would fall under the blanket "good for everyone". Plus, I have tried so many shampoos growing up in the hopes that I would have model hair, only to realize the obvious power of a good blow out and photoshop. So, that model hair will probably never happen, but if I can make my hair healthier to begin with, it certainly cannot hurt.

So, what was the verdict?

          Pros: 
  • The smell was very nice, and it was the same beautiful lavender pink color as the packaging. It wasn't overly thick, and it wasn't overly runny.
  • The shampoo lathered up very nicely and rinsed out easily. The conditioner was very similar

    Cons:
  • I had to use quite a bit of shampoo (the whole sample packet, but I know that this is the idea of a sample packet) to feel like I was getting my hair adequately clean, and I have medium length hair.

Day 1: I am impressed so far, and my bangs (which I always blowdry out) are soft and shiny.
Day 7: I am still very impressed, and my honest review is that this is truly a great shampoo for my hair. No matter how dirty my hair was, the shampoo had no problem lathering up and getting it clean. It didn't leave it excessively dry, which can be a problem for me as I have dry hair to begin with. It felt thicker after the seven days, which I'm not sure I needed, as I have ultra thick hair. Everytime I go to a hair dresser they ask me... did you know you have the thickest hair I've ever seen? Super. :( But, it feels healthier and I am pleased. I'll probably be purchasing a bottle as soon as my other shampoo runs out.

What are your thoughts? Have you tried this shampoo? Do you have a shampoo that you recommend for dry, thick hair? Thanks for reading!

Disclaimer: I'm not being compensated by Clear Hair Care or any other company for this review. Just signed up for the sample and thought I'd share my thoughts! :)


Friday, April 19, 2013

It's Pinspired Friday! {"Heaven is a Little Closer in a Home by the Lake" Quote Pillow Tutorial}

I've got an easy decor piece for you today! It's Pinspired Friday!


My in-laws came over last weekend to visit and my mother-in-law and I went over to the local store to grab a few things. One of the things we ran across was this super cute pillow in a beautiful french ticking fabric with a great quote on it:

From Uptowncountryhome.com - Not the exact one (the one I saw was about 10" x  10" and had blue ticking) but close
And I was smitten - until I just about fell over from the price tag... $24.99! So I quickly put (really quickly, haha) it back down and walked away. It hit me a few days later... I could really easily make something just like that! And you can too! :)

So while the pillow wasn't "Pinspired", I wasn't sure how to cleanly get a quote on fabric without painting or using a stencil... so off to Pinterest I went. A lot of sites said that using paper, spray adhesive, and an inkjet printer was the way to go... but I didn't have any spray adhesive. Then in the comments section of one of the sites, someone mentioned that using freezer paper was a better method... and that I did have. Because I already had the fabric, freezer paper, inkjet printer, and sewing machine, the cost for this project was free. Much better than $24.99 for something very similar!

Want to make your own? You'll need:
• Freezer paper (not wax paper)
• Fabric (if you're making a small pillow like mine, you'll need two pieces at 8.5"x11" each.)
• Polyfiber or other pillow filler

You'll also want:
• An inkjet printer (not laser)
• A sewing machine
• An iron

If you're making your own quote, you'll want to download the font "Bebas Neue" from Dafont.com.
If you want my quote, I'm sharing it in .PDF format with you lovelies :) (but please do not abuse this and use for profit... please only use for your personal use.) Document Here

A quick rundown if you're making your own quote:
• Change the layout to "landscape" so the paper is horizontal.
• You'll want to set your margins to 1" all around.
• Change your font to Bebas Neue
• Center your quote on the page


• Play with the spacing on your quote until you find what you think looks best. Mine was a combination, line by line spacing so the quote would have that block quote look. I believe it ranged from 10 pts to 16 pts.
• My font size was 77. You may need to adjust yours according to how long your font is.

Now back to if you're going to use the quote I provided...
Open the quote .PDF in Adobe Reader or other similar program. Get your inkjet hooked up if it's not already.


Pick out your fabrics. Each piece has to be 8.5"x11". You may find that tracing a piece of paper is helpful.

Cut out your freezer paper to 8.5"x11". You'll have one side that feels "sticky" or waxy, and the other side will feel like paper.

Iron your fabric out so it's not wrinkly, and after the fabric is smooth, place the freezer paper waxy side down on the fabric. Iron the paper side, which will activate the waxy part and stick to your fabric.

Cut around the fabric around the freezer paper. Try not to fray the fabric as you don't want it to get stuck in your printer. Leave your iron on (but don't forget about it! :) because you'll need it later.

Your setup might be different, of course, but load your fabric/freezer paper into your inkjet. Mine loads up top and shoots out the bottom. Once again, yours might be different, but I had the fabric facing out towards me and it printed right on the fabric. If it accidentally prints on the paper and not the fabric, reload the other way and try again.

Let it sit for about ten minutes before touching it. Luckily, my inkjet dries pretty fast, but I wanted it to have enough time to cure. While this is going on, iron your back of the pillow fabric if you have not already done so.


I love how crisp the lettering looks on the fabric!

Now that your quote is dry, and your back fabric ironed, trace your top fabric onto your back fabric so you have two same sized pieces if you have not already cut both pieces ahead of time.

If your back fabric has a right side and a wrong side, make sure your right sides are facing in (the side you'd want to see when the pillow is turned inside out after sewing the sides) and pin.

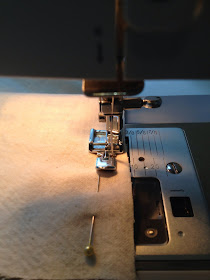
I used the zipper foot so I could get a 1/4" seam allowance. Sew the two long sides and one of the short sides. Trim your two corners.

Turn your pillow inside out. Flip the open edges under about 1/4" and iron the entire pillow (I ironed over the letters with no problem). Head back to your sewing machine...

Top stitch around the three sides again, leaving the pressed under side open. Stuff your pillow with polyfiber and then pin it closed so that you can topstitch that open side, so don't overstuff your pillow as it will make the quote hard to read and it will be a pain to try and close that side with the machine. Top stitch the open side to close the pillow and...


You've got a very cute quote pillow! The finished size is about 7.5" x 10", so not very large but a nice little decorative piece. And yes, it's easier to read in real life... the picture distorted it a little, haha. I imagine you could probably do something similar with an 11"x17" piece too!

And here is the back!

Hope you enjoyed this tutorial. Do you have a special quote you're going to use? Tell me all about it! I'd love  to see what you create. See you next week, have a great weekend!

I'm linking up to these linky parties!
Somewhat Simple
The Brambleberry Cottage Linky Party  French Country Cottage Linky Party

Friday, April 12, 2013

It's Pinspired Friday! {Skinny Chocolate Chip Banana Bread}

Hi all! It's Pinspired Friday!


Today, I'm inspired by this pin from Skinnymom.com.

Skinny Chocolate Chip Banana Bread from Skinnymom.com
And here's what I came up with:


It all started when I had a banana on my toast with some peanut butter this morning and I realized the bananas were starting to look a little sad. And brown. Which only means one thing... it's banana bread time.

But I wanted to continue eating healthy, so off to Pinterest I went in search of a recipe and found this one by Skinnymom. So I gathered my ingredients and gave the recipe a once over to make sure I had everything, or could substitute things that I didn't have.

At first glance, the recipe seemed a little... off. First, we're cooking at 330 degrees, which... okay. It's just an odd temperature. As I'm mixing though, it feels like I'm making a lot... then I notice in direction #9 that it's because the recipe is for 2 loaves. Oy. That's what I get for skimming! (In the end, the mixture really only made enough mix for about a 2/3 full size loaf pan. So if you want two short loaves, go for it, but I put it all in one.). Then... as I'm skimming, I'm making a metal list of the gadgets and bowls I'll need... and I read it as needing four separate bowls for mixing all of the ingredients!

This is kind of how I felt at that point.


Luckily, I actually read (reading is fundamental!) and realized she called for three separate bowls. But, if you've been reading my blog for any length of time, I'm not a fan of extra or unnecessary bowls and dishes when prepping food. So I got it down to two. I could have probably done even just one bowl... but I was photographing it for the blog and wanted to make sure it turned out. Ha!

So let's make some chocolate chip banana bread, shall we?
You'll need:

• 2 1/2 - 3 very ripe bananas (I used 2.5)
• 6 oz of vanilla fat free yogurt
• 1 tbsp of I can't believe it's not butter spread, or similar
• 2 egg whites (I used one full egg and 1 egg white)
• 1 1/2 cup unbleached flour (doesn't matter if bleached or unbleached, but has to be all purpose)
• 1 tsp salt
• 1 tsp baking powder
• 1 tsp baking soda
• 1/2 cup brown sugar
• 1/2 cup splenda granulated sugar (I use about half and half real sugar and splenda, or 1/4 cup of each)
• 1 tsp vanilla extract
• 1/3 cup semi-sweet chocolate chips

First off, preheat your oven to 330 degrees, if you're making two small loaves. Otherwise, preheat your oven to 350 for one big loaf. I did the 330 for 1 big loaf and it ended up taking about 45-50 minutes for it to (finally) cook through, along with about 10 minutes using the convection cooking option on my oven... toooo long.

Grease up your loaf pan (or two) with non-stick spray or Crisco.

In a bowl, mash up your bananas. Make sure you're using a bowl big enough for other ingredients. Once you've got them smashed, kind of push them up on the side of the bowl. I'm helping eliminate an extra dish to wash here. ;)

Add the butter/spread, yogurt, vanilla extract, brown sugar and splenda/sugar. Mix those together, trying to avoid mixing in the banana mash initially.


Then, mix the bananas in, along with the egg whites.


Now, in a separate bowl (you can be a rebel here if you want and use the same bowl, I would imagine), add the flour, salt, baking soda, and baking powder. Mix.


Now, add the flour mix to the liquid mix. Mix together until blended, but take care not to overmix as it is a very heavy, dense mix. Then, add your chocolate chips.

Transfer the mixture into either a) two loaf pans, which will probably be about 1/3 full in each loaf pan) or b) in one loaf pan. I'm doing one loaf, and you'll see that the loaf pan is about 2/3 of the way full.


For one loaf - bake at 350 for 25 minutes, checking on it in the last 5-10 minutes. You may require more time or less.

For two loaves - bake at 330 for 30-35 minutes, checking in on them in the last 5-10 minutes.

When a butter knife comes out clean, the banana bread is done! :) Sometimes you'll hit a chocolate chip, so it may take multiple times to figure out if the bread is actually done.


And there you have it! As you can see, the middle of mine caved as it was not cooking as evenly as the outside - but it still tastes awesome. :) The yogurt is such a great idea for dropping almost all of the butter and you truly cannot taste the difference. I was pleased that this had such a great taste, especially with using Splenda, as I have had little luck in getting my "desserts" tasting like anything besides plastic when using Splenda only. Of course, because I used half splenda, half sugar it brings the calories up just a bit.


Enjoy!

I'm linking up with these parties!