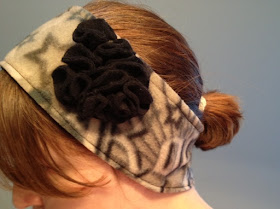
Happy Friday! Christmas is just around the corner, and hopefully you're well on your way to figuring out Christmas gifts. If not, have no fear! I've got an easy, cheap, and warm gift tutorial for you today.

It all started when I pinned this about 4 weeks ago:
 |
| At Second Street: Fleece Ear Warmers |
This is a very easy tutorial. This would probably be a great beginner craft for a child or teen even.
I was given a bunch of fleece pieces by my grandmother's associate and friend - they all ranged in sizes and shapes and colors. I grabbed this fun piece of "rock" fabric and some black fleece, and went to town. Want to recreate this? You'll need:
• 2 pieces of fleece fabric (coordinating or contrasting), 24.5" x 3.5" long (May need shorter for child)
• A button (I used a 1" size)
• Sewing Machine and needle and thread for attaching button
• Felt for flower (see below)
• Something circular to round corners.
If you're going to make the flower, you'll need about 8-10 2" or smaller circles cut out of the felt. They don't have to be perfect as you're folding them.
Cut out your two pieces of fabric, 24.5x3.5". You might need to go smaller if you're making this for a child or teen.
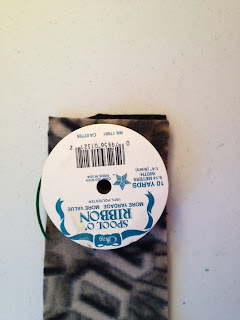
Lay your two pieces together. You'll want to place the fabric right side up as we're just going to sew around the edge... no turning inside out here. Fleece thankfully doesn't fray. Using a very scientific method of tracing a ribbon spool (or cup, whatever you can find that works), trace your corners.
What is so nice about this project is that it is very forgiving, which makes it such a good project for someone young or for someone just getting into crafting and sewing.
Now with your corners cut, and your fabric lined up, get your sewing machine ready to sew. I used black thread - the thread sinks into the fleece just a little so it's not very obvious.
Sew around the outside with a 1/4" seam allowance. I use my zipper foot because it's just easier for me to line the side of the fabric with the side of the foot. I recommend not starting in either curve, but right after a curve.
Your fabric might get a little wonky with shifting and such (fleece is kind of notorious for this) so trim up your edges so they match.
Cut your button hole by folding the fabric over and making a small slit. Be careful not to cut it too large. Because it's fleece, we won't need to sew around the hole as it won't unravel. Yay! I cut my button hole to 1/2" for a 1" button (it stretches quite a bit!), so that's about a 1/4" cut (because you're cutting into the fold. :))
On the other end, sew your button. You'll want to sew your button on the top of the fleece that faces outward, unless for some reason you don't want the button to show (this will be harder to fasten, too)
Now, if you're going to make the flower, proceed: if not, go ahead and put on your ear warmer! How easy was that?
Cut your circles, if you haven't already. I ended up using about 8-10 circles. Get your thread and needle ready. You'll want a fair amount of thread.
Pinch the circles in the midle like so. They kind of look like fortune cookies! Align them up on your head warmer and start sewing them to the fleece. I imagine you could hot glue them too if you wanted, but I think in this case thread and needle might be easier. Sew them in a cluster until a flower starts to form!
And there you have it! A cute, easy gift for someone you love or even a gift for yourself.
 |
| A weird angle - the flower is definitely more circular in real life! |

Did you like this tutorial? Help me out by pinning it to Pinterest! Got to have it? It's available in my Etsy shop! Thanks for following along!
Don't forget to take advantage of FREE SHIPPING in my Etsy store until 12/25/12! Use coupon code LITTLEOAKCHRISTMAS12 when checking out!


No comments:
Post a Comment