Tuesday, October 8, 2013

Knockoff Earrings for Less!

Have you ever shopped at Shopko? I will admit, when I first checked the store out, I thought it was a little weird. To me, it feels like a mix between a Kmart and a Big Lots... they've got all you'd need, but it's often at a premium for sometimes not-so-great quality, unless you're shopping the ad or clearance. It's a weird little mix of a store but I secretly think it's pretty fun to shop the clearance, because when they go to clearance, they really go to clearance.

Enter these earrings:


It's funny, because in this picture, they don't look so bad - I like that color yellow. But in reality, the jewel was NEON yellow, not Big Bird yellow. Neon yellow isn't really my speed anymore... but I had seen these earrings on the Young House Love blog before (they're apparently a Sherry favorite):

Kendra Scott Jewelry - Danielle Earrings in Green - $60.00
and couldn't help but notice how these were almost exactly the same earring shape and size... but not with a $60.00 price tag:


...but with a $1.40 price tag. I can make a $1.40 work. Here's what the back looked like... they actually look and feel like a high quality earring (and you can see they are more neon in this picture):


I knocked out the jewel part...


which was easy to do... it was only being held in two spots on the sides. Easy!

I grabbed my Rust-oleum Oil Rubbed Bronze spray paint, and gave the jewels two light coats so they wouldn't drip.


Ironically, used the Shopko ad to catch the paint...


Looking good! I had to make sure to let them dry for a while as plastic doesn't absorb the paint at all.

I used hot glue to put the jewel back in, but will use Krazy Glue gel formula to really secure the jewel when I get some more :)


Pushed the jewel back in with a hint of glue, and they came out gorgeous! Much more my "speed", and a pretty color for fall! They remind me of these ones by Kendra Scott as well!

Kendra Scott Jewelry - Danielle in Black - $60.00

These are a great testament to always keep an open mind when shopping - a lot of things can be changed to fit your taste! Thanks for reading!

Saturday, October 5, 2013

Low Carb Mock Danish with Cinnamon Glaze - An Alternative for Low Carb Breakfast

Good morning all!
When a some following a low carb breakfast has had eggs the past 5 days in a row, the thought of having eggs for day 6 leaves their faces looking something like this:

D:

So, I've got a low carb alternative for you, low carbers! Enter the mock danish - an easy to cook, mildly tastes-like-you're-eating-desert-for-breakfast treat. I found the recipe here and thought it was so good, that I wanted to share it with you all.

You'll need:
2 ounces cream cheese (I used Neufchatel cream cheese - slightly less carbs (cream cheese has 1, Neufchatel has less than 1. Oooo.) and less calories.
1 egg 
2 teaspoons granulated Splenda or equivalent liquid Splenda 
1/2 teaspoon vanilla 
Pinch of cinnamon


In a small, shallow bottomed glass bowl (I used an Anchor Hocking/Pyrex type bowl), add the cream cheese and microwave for 30 seconds. It should look something like this once mixed:


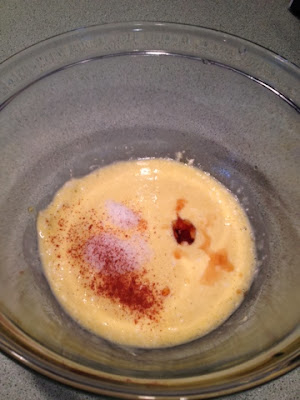
Now, add the egg and beat until relatively smooth. It's best to do this while the cream cheese is still hot. Add the Splenda, cinnamon, and vanilla extract.


Beat until well mixed.

This is about how shallow my bowl is, which made for a perfect cook up. I've tried this before on a Corelle plate, it doesn't really ever cook correctly.


Once mixed, Microwave on HIGH 30 seconds; rotate the bowl (do not stir) and cook another 30 seconds, unless you have a microwave that has a turntable, then turning the bowl is not necessary. 


If the center still looks too runny, cook another 30 seconds. It may take up to 2 1/2 minutes total, depending on your microwave. The center should be a bit soft for the danish filling effect. Run a small rubber spatula around the danish, then under it to release from the bowl and put it on a plate. It'll probably fall apart a bit like mine, but it still tastes great. :)


Now, if you want to make the cinnamon glaze, melt 1 tbsp of butter, a teaspoon of splenda and a bit of cinnamon together. I wouldn't really recommend it, as I didn't care for the taste, but you might like it!


So there it is! A low carb, mock danish. According to Genaw.com, this recipe has:

With granular Splenda:
Per serving: 283 Calories; 25g Fat; 11g Protein; 4g Carbohydrate; trace Dietary Fiber; 4g Net Carbs

With liquid Splenda:
Per Serving: 279 Calories; 25g Fat; 11g Protein; 3g Carbohydrate; trace Dietary Fiber; 3g Net Carbs

If you use Neufchatel cream cheese, you can knock another half carb off of there. Enjoy!

Friday, September 20, 2013

No Bake Cookies

One of my favorite "go-to" recipes of all time just happens to be a dessert. :) I love to make no-bakes because they tend to be one of those recipes that I always have everything they require on-hand... and they are amazing. The only downside to this recipe and to making these cookies - for "no baking" required, they are FICKLE. You need to boil them for just the right amount of time, or they will either not set up and be a plate of mush (which still tastes great, let's be honest) OR they'll overcook, not taste so awesome and be crumbly. You need to hit that perfect sweet spot of boiling time. I usually cut this recipe in half when I make them, but have greater success in getting them to set up when the whole recipe is made.


So to make these, you'll need the following:
• 1 3/4 cups white sugar (I have not had success with a sugar substitute)
• 1/2 milk
• 1/2 butter
• 4 tablespoons unsweetened cocoa (hint: make them heaping tablespoons for an even better taste)
• 1/2 cup peanut butter
• 3 cups quick-cooking oats
• 1 teaspoon vanilla extract


In a medium-large saucepan, combine the sugar, milk, butter, and cocoa powder. Bring to a boil, and cook for 1 1/2 minutes. You need to time the 1 1/2 minutes from the point you get to a rolling boil, not to where you see one or two bubbles, otherwise they'll be TOO soupy!

While the mixutre is boiling, I usually get my peanut butter ready and oats ready, at least the first cup of oats, as this is a time sensitive recipe.


Once 1 1/2 minutes is up, remove from heat and stir in the peanut butter, oats, and vanilla.


Drop into cookie sized portions onto wax paper. I usually use the same spoon I used to mix everything in the beginning. Let them cool until hardened - which can take a little bit, especially if your kitchen is warm, or if you've undercooked them a little. If you are impatient, you can stick them into the freezer for a little bit!

Thanks for following along!


Friday, August 16, 2013

It's Pinspired Friday {Look for Less}


Ever since I joined Pinterest, I've had a "My Style Board." I've pinned a lot of different looks, and it's been fun to work with what I got to switch up my style. I've learned new ways to wear things, and it's definitely helped me get outside my comfort zone and try patterns and styles I may not have tried before.

I've had this look pinned for 2 years, according to Pinterest (wow!) and yes, it's Kim Kardashian. There is very few things that she wears that I would wear, but this look looked so comfortable and easy to dress up and down, that I knew I had to pin it. It also gives me a new way to wear army green without looking like I joined the army.

I looked through a few places online to gather the pieces for this outfit, and I tried to stick to places that were easily accessible and most of all, affordable. The best part about this outfit is that you probably already have a few of the pieces!
Look for Less


Forever 21 short sleeve tee
forever21.com - $3.80


Charlotte Russe ankle strap shoes
charlotterusse.com - $24.50


Charlotte Russe zip pouch
charlotterusse.com - $29.99


Charlotte russe
charlotterusse.com - $1.99


jcp™ Cropped Pants - jcpenney
jcpenney.com - $19.99


Amazon.com: Fashion Jewelry - KNIT BALL FRINGE RUFFLE SCARF- By...
amazon.com - $27.00


Before shipping, taxes, and all of that good stuff, you can get the entire look for $132.26! And you can't beat those aviators for $1.99... :) I think I might have to give this look a try soon!

Got a look you want for less? Send it to me or leave it in a comment and I'll find it for you!

Wednesday, August 7, 2013

Savory Venison Skillet

Hi all!

Fall is right around the corner (yay or nay?) and that means lots of us will be (hopefully) enjoying venison soon. You might have heard that venison tastes game-y, or that it's tough... well, I had a package of ground venison tonight to use and let me just say, either this venison was not game-y, or this recipe just did a really, really good job of covering up any game-y taste. I think it may have been the later. It was really, really good.

Enter... the Savory Venison Skillet. 


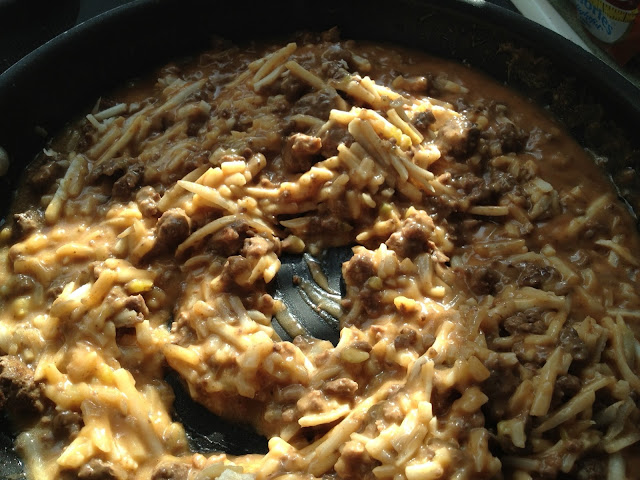
So easy to make... and even though it looks like a hamburger helper dish, I used real cheese (not powder), and the taste is completely different from what it looks like... much less "cheesy" and more savory from the ketchup and Worcestershire. Because this only uses 7 basic ingredients, it's a great "clean out the fridge" meal, using what you most likely already have on hand.

You'll need:
1 pound ground venison

1 can (10 1/2 ounces) Condensed Cream of Celery Soup
1/2 cup water
1/4 cup ketchup
1 tablespoon Worcestershire sauce
2 cups frozen hash-brown potatoes
3 slices cheese (The original recipe called for process cheese, I call for sandwich slices of reduced fat 2% milk sharp cheddar. Mmm!)


First, cook the venison in a skillet over medium-high heat until well browned, stirring often to separate meat. Drain any fat and return it to the pan. I had very little fat... an awesome venison benefit.


Right on top of the meat, add the soup, water, ketchup and Worcestershire in the skillet, mix together and heat to a boil. 

It looks a bit like glop and eggs, but bear with me here.


Stir in the potatoes. Reduce the heat to low. Cover and cook for 10 minutes or until the potatoes are tender. Top with the cheese and serve! I added a hint of salt and pepper on top of mine and it was delicious!


I really am a fan of venison, and there actually are some health benefits - a few to touch on is that wild harvested deer have no added hormones, it's actually lower in fat than even a chicken breast (only 2% of it is fat... hence why not much of it was in my pan after browning!) AND lower in calories - a 4 oz. serving of venison has roughly 95 calories whereas a 4 oz. serving of pork or beef has well over 300 calories per serving. Check out Michigan Venison for more health benefits. I didn't know most of them before I looked them up for this post!

Did you enjoy this recipe? Or do you have any other venison recipes? I have some venison sausage and venison steak in the freezer that I can't wait to try out!


Wednesday, July 24, 2013

Nautical Home Decor on a Dime

One of my favorite "things" in the past few years has been home decor. I could spend hours looking at home decor on Pinterest. But, my favorite home decor ideas and styles are those that don't cost an arm and a leg. I've recently "completed" (I don't think any room is ever really "complete") my sunroom in our house, and I thought it would be fun to share how it came together.


We are fortunate to rent a lovely older house close to a lake. The house has a lot of white, which is great for a nautical/coastal feel. In this sunroom, the ceiling is blue and the floor is painted a brick red. Since we're renting, we're not repainting, but I think sometimes it's a fun challenge to work with what you got.

So let's have a look around, shall we?


  • First, what everything rests on: my coffee table that I've had since college. Even though all of the other wicker in here is white, the room needed a pop of brown and I think it works well in here. It was a Pier 1 Imports item that we got a garage sale for $10.
  • My seagull. Mama LOC and I were garage saling (you'll find this is a recurring theme) and she saw this bird and wanted to get it for me... and I LOVE it. It's one of my favorite pieces, both because my mom picked it out for me and because it fits so perfectly. He was $2.
  • My English ivy and white pot. The pot was from T.J. Maxx, $4.99 (I got a few cents off for a small chip, though), and the English ivy is a champ from last summer... I kept him alive all winter in the sunroom, he started outside!
  • My lantern. Another one of my favorite finds, I've had this for a few years too. It's an LED candle in a metal and glass lantern. I got it at a thrift store for $4, and it works great and has for years.

This is probably my favorite wall in this room because I took a leap of faith by placing the items so close to each other, but I think it works really well.
  • The wooden Americana flag was a garage sale find, I think it was .50 cents. Americana is not really my favorite decorating look, but the red and blue tie the room together well, and I think the size is really neat, it's about 11"x15". The roughed up look keeps the vintage vibe, too.
  • Speaking of vintage, how cool is this birds in color print? It's an old scientific type knowledge card. The colors are amazing and it fits really well in here, with the blues working with the blues of my bird. The frame is vintage, it was a $1.00, the card was - get this - .10 cents at a garage sale.

These are some of my most thrifty big impact art pieces, and you won't believe the story behind these. I remade these before the LOC blog was even a thought, so unfortunately I don't have any before pictures of these frames. I always check the art at thrift shops, because you just never know. I was actually looking for big art for my living room to flank two sides of the main window, when I stumbled across these frames. They were 17"x21" each, the wood frame was a nice shade of pukey sage green with a crackle effect (that's how you know they were amazing) and they held two different scenes of watercolor-y type garden scenes. The art was not awful, but not my cup of tea either. They were just posters, and the glass is actually plexi, so they aren't ultra high quality expensive frames, but I guarantee someone paid more than $2 each for them... which is all I paid! 

So how did I get the art? The stripes is a vintage piece of fabric with navy ticking, and the shells are literally a piece of paper printed with a color printer. The shells are from The Graphics Fairy. You can actually see just a hint of the blueish purple border the original print had around the fabric. I used some black acrylic paint I already had for the frame. So for less than $5, I have two big impact pieces!


The wicker couch is a neat piece. The couch and rocking chair are both antique, and from my Grandma, so I am blessed to have them. They have always been white (for as long as I can remember them... some flecks indicate they may have red and green at one point), but the cushions had a purple floral, and all of the pillows were purple. They actually were a very lovely fabric, but it wasn't quite the feel I wanted for the room.
  • I purchased a complete King size duvet cover set from eBay to get all of the fabric I would need to completely cover these cushions, and the rocking chair cushion too. I paid $26 incl. shipping, and had WAY more than enough fabric to do everything I needed in here. It's a neat textured linen feel - it's the Thomas O' Brien "Navy Awning Stripe" set from Target, which retails for originally around $129 bucks.
  • I patch-worked the blue square pillow cover with fabric scraps in my stash.
  • The navy and white stripe pillow was a vintage silk shirt that got washed (whoops) that never really fit perfectly anyway, so I had exactly enough fabric for this pillow.
  • The graphic burlap pillow cover is from Pottery Barn - I got it new in package from eBay for $10 including shipping, and it retails anywhere from $49 to $79 (choke)


One of the cool vintage touches is this fishing pole across the top of a window - I like to think of it like a curtain rod - how cool would that be? It has a neat cork handle and an old school "lure". It was Mr. LOC's idea and I really like it.


This was a project before the blog too, but my friends were getting rid of these chairs that were covered in a grey fabric, and I covered them in a gorgeous Nautica sheet that I got brand new at a thrift store for $1.99. Of course, the Heaven is a Little Closer in a Home by the Lake pillow was made a little while back here on the blog - check it out :) I used scrap fabric for that too!


Not exactly easy to take a picture of a whole room in one shot, but here is the whole sunroom. Note our little LOC mascot, Sophie... :)


Hope you enjoyed this little trip around our sunroom! For easily less than $100, the room has a completely different feel and look! It took a bit of time (over 2 years to get to this point) but I feel like it's a great lesson in "good things come to those who wait!"

Wednesday, July 10, 2013

Wake-Up Waffles {A Low Calorie Breakfast!}

Waffles. Peanut butter. Bananas. How 'come I've never thought of the three put together before?

In the eternal struggle of "weight loss," I've been searching for easy breakfasts that are low in calories, taste great, and are quick and easy to prepare. I work much closer to an Aldi's now and I love that they have a "Fit and Active" line of foods that are inexpensive AND are healthier options, so I've been giving that a go. So far, everything has tasted really, really good, and these waffles were no exception. 

Introducing... Wake Up Waffles! (clever, eh?)

This whole Wake Up Waffle has only 213 calories for one and packs six grams of protein! Ready to make your own? You'll need:

• A half of a banana
• 1 tbsp of peanut butter
• 1 multigrain waffle 

You'll also want:
• A toaster oven (or toaster)
• A butter knife


Prepare your waffle as directed (I toasted mine in the toaster oven). When it's complete, smear a tablespoon of peanut butter ( I eyeball it, and probably used less than a tablespoon), and slice your bananas, setting them atop the waffle.


Easy and so tasty! The banana's stick pretty well to the peanut butter so you could possibly make this grab and go, too! Thanks for following along, enjoy!


Thursday, July 4, 2013

Happy 4th of July and Rhubarb Pie

Hi all and Happy 4th of July! Where has this summer gone?

Around the middle/end of June, I spied that my rhubarb plant had taken off and had given me a bunch of nice, new stems. Both of our rhubarb plants caught some sort of blight-like disease last year and we ended up not having rhubarb very long. So when I saw that the plant (only one came back :( ) had given me enough for a pie... I ran out there with kitchen scissors like a mad man (not really, running with scissors is not recommended. But I did get out there pretty darn quick.)

Now I haven't always been a fan a rhubarb, although like many children, I never gave it a chance either. In our first summer of living here, I gave it a shot and I was hooked. This is the recipe I never waver from because it is that good.

Rhubarb really can shine alone without the help of strawberries or other fruits. When you pack it with enough sugar, it evens out the extreme tart of rhubarb and creates a sweet and slightly tart pie that is really good warm, but even better cold in my opinion... which makes it the perfect pie for picnics.

Ready to make your own? You'll need:
• 4 cups of chopped rhubarb. (This is where I waver only a little... I think I had only about 2 3/4 cups of rhubarb when I was all said and done. This makes for a still tasty pie but 4 cups would definitely make for a thicker pie.) This requires a LOT of stems to get to 4 cups - pictured below is roughly 2 3/4 cup.
• 1 1/3 cups white sugar
• 6 tablespoons all purpose flour
• 1 tablespoon butter (real salted butter, not margarine)
• A 2 pack of premade pie crusts, you'll use both.

You'll also need:
• a pie plate
• a large measuring cup (up to four cup)
• cutting board/knife
• mixing bowl

First, preheat your oven to 450 degrees. Chop the leafs off and the wide bottoms off as well. Make sure to discard the leaves properly, especially if you have pets and small children as they can be quite poisonous if ingested... but the stems are good to go.


Rinse them off, pat them dry. Chop the rhubarb into small slices - the smaller the better, as they'll cook down the best this way.


In a mixing bowl, combine the sugar and flour. In in your pie plate, unroll a pie crust and set in the bottom of the pie plate. The pie plate doesn't require greasing before you put your crust in.


Sprinkle about a 1/4 of your flour and sugar mix on top of the crust. This doesn't have to be exactly 1/4 of your mixture, just eyeball it. Heap the rhubarb on top of the mixture in the pie plate, and then sprinkle the remaining sugar and flour on top of the rhubarb.

Take your tablespoon of butter and chop it into little pieces. Dot the butter randomly on top of the mixture. It should look something like this:


Cover with the remaining crust and pinch the sides together. Make some fancy slices in the top to be...well, fancy. (This actually helps some steam escape, but it looks nice too.)

Place your pie in the oven and bake at 450 for 15 minutes. After 15 minutes has completed, reduce the temperature to 350 and continue baking for 40 to 45 minutes. Do keep an eye on your crust... sometimes I have to place some tinfoil around the edges if they start to brown too much. Serve warm or cold, with vanilla ice cream is the best! :)


Thanks for following along! Have you ever had rhubarb pie? Have you had it before but with strawberries in it? Share your stories in the comments and share this recipe with your friends -- or don't and blow everyone's minds with this amazing recipe at your next picnic! Have a safe and happy 4th of July!


Labels

Flickr Images

Like us on Facebook

Popular Posts


Little Oak Creations Template by Ipietoon Cute Blog Design

Blogger Templates