Showing posts with label breakfast. Show all posts

Wednesday, March 25, 2015

The Best Biscuits and Gravy Recipe

"The best" is a pretty big claim, eh?
I'd put this recipe right up there with the best. It's a pretty easy recipe as long as you have all of the ingredients.

Chances are if you've stayed over at the LOC house, you've been served these the next morning. It's my go-to recipe for feeding about 4 adults because it's so hearty and such an unforgettable meal. The taste is great by itself, or add a bit of hot sauce for dimension.


"The Best" Biscuits and Gravy Recipe
 (Yields about 4 adult servings)

You'll need...
  • 2 1/4 cups of flour total (2 for biscuits, 1/4 for gravy)
  • 2 1/2 teaspoons of baking powder (not baking soda!)
  • 1/2 teaspoon of salt and more for the gravy (1/2 t for the biscuits, to your liking for gravy)
  • 1 Tablespoon of sugar
  • 1/2 cup of butter, diced (1 stick)
  • 3 3/4 cups of milk (1 1/4 cups of milk for biscuits, 2 1/2 for gravy)
  • 1 loaf of sausage, thawed if frozen
  • Black pepper to taste 

1) Preheat oven to 450.
2) In a bowl, mix 2 cups flour, 2 1/2 tea. baking powder, 1/2 tea. salt, and 1 Tbl. sugar in a bowl.Once mixed, cut your butter up into small cubes, and cut it into the mixture. I often use my hands for this part to get all of the butter mixed in. It should look like crumbs once it's mixed in. Not everything will be covered in butter.
3) Slowly add 1 1/4 cups of milk to the dry goods mixture. Stir as you pour.

4) Now, drop spoonfuls of the batter to an ungreased cookie sheet. By this time, your oven should be close to preheating or already there. Place the biscuits in, now it's time to make the sausage gravy.

5) Place the sausage loaf in a pot. Brown the sausage, crumbling it as you go.


6) Once all brown and crumbled, add the 1/4 cup of flour to the sausage. Stir to coat.

7) Gradually stir in the 2 1/2 cups of milk. Add salt to your taste (I would start with 1 teaspoon and go from there) and black pepper to taste. Let the mixture come to a boil, then reduce heat and let the gravy simmer for about 2 minutes.

8) By about this time, your biscuits should be ready! Let both cool for a minute or two, then enjoy!


Wednesday, July 10, 2013

Wake-Up Waffles {A Low Calorie Breakfast!}

Waffles. Peanut butter. Bananas. How 'come I've never thought of the three put together before?

In the eternal struggle of "weight loss," I've been searching for easy breakfasts that are low in calories, taste great, and are quick and easy to prepare. I work much closer to an Aldi's now and I love that they have a "Fit and Active" line of foods that are inexpensive AND are healthier options, so I've been giving that a go. So far, everything has tasted really, really good, and these waffles were no exception. 

Introducing... Wake Up Waffles! (clever, eh?)

This whole Wake Up Waffle has only 213 calories for one and packs six grams of protein! Ready to make your own? You'll need:

• A half of a banana
• 1 tbsp of peanut butter
• 1 multigrain waffle 

You'll also want:
• A toaster oven (or toaster)
• A butter knife


Prepare your waffle as directed (I toasted mine in the toaster oven). When it's complete, smear a tablespoon of peanut butter ( I eyeball it, and probably used less than a tablespoon), and slice your bananas, setting them atop the waffle.


Easy and so tasty! The banana's stick pretty well to the peanut butter so you could possibly make this grab and go, too! Thanks for following along, enjoy!


Monday, June 3, 2013

Apple Walnut Cake

Hi all! It's been a quiet May around here and I hope to be posting a little more in June as I get into more of a routine.

Today I am making Apple Walnut Cake, a recipe that I found originally in the Glycemic Index Cookbook. This cookbook is actually one my mother picked up for me at a yard sale, and man, there are some gorgeous low GI recipes that actually look pretty do-able and don't have a million ingredients, AND look yummy.


This recipe was good - just enough sweetness to silence that sweet tooth, but not enough to leave you craving eating the rest of the pan. Does that make sense? Sometimes I feel "I can't get enough!" when something is ultra sweet and I want more... where this recipe is just enough. It's not ultra rich where you feel "bleckk" the rest of the night, either. Although, I highly recommend just a HINT of vanilla ice cream... :)

Ingredients:
3/4 cup of all-purpose flour
2 teaspoons of baking powder
1 1/2 teaspoons apple pie spice
3/4 teaspoon salt
2 1/2 cups chopped sliced Granny Smith apples (they said that's two large apples, it took me four.)
1/4 cup plus 2 tablespoons packed brown sugar
3/4 cup sugar substitute. (I mix my regular sugar with my Splenda-like sugar substitute, so I didn't use just straight up sugar substitute.
4 1/2 tablespoons of margarine or butter, melted. (I used margarine, next time I would use butter.)
3/4 cup fat-free/skim milk
3 eggs
1 1/2 teaspoons vanilla
1/2 cup chopped walnuts

You'll also want:
A large mixing bowl
An 8x8 glass pan
A large Pyrex type measuring cup. I used the 4 cup version.

First, preheat your oven to 350. Just a heads up - this recipe takes 50 minutes to cook, so don't make this recipe if you want "instant" results ;) While you're at it, spray a 8x8 glass pan with cooking spray.


Combine flour, baking powder, apple pie spice and salt in a bowl. Use a larger bowl, as you'll be mixing in this later.

Slice your apples and dump them in the prepared baking pan. Using the large Pyrex measuring cup, beat the brown sugar, the sugar sub, and melted margarine until well blended. My suggestion: once you've got the apples out of the measuring cup, melt the margarine in the measuring cup, then add the sugars. No sense in getting other dishes dirty!

Now, once the margarine and sugars are mixed, whisk in milk, eggs and vanilla, mix until smooth. Then, dump this mixture into your awaiting flour bowl from earlier. Stir until smooth.


Pour the mixture over the apples. Sprinkle the walnuts over the batter.


Bake 45 to 55 minutes or until knife inserted in the center comes clean. Let it cool for 10 minutes when it comes out. Serve warm, and refrigerate leftovers.


Hope you enjoyed! This makes 9 servings and has 204 calories per serving, 23g of carbohydrates, 12g fat, 2g Saturated fat, 2 grams of fiber. Thanks for following along!

Friday, April 5, 2013

It's Pinspired Friday! {Green Tea Mango Smoothies}

Good morning all!

I am happy to report that a) I am down 2 pants/skirts sizes as of yesterday. I had a sudden BURST of energy yesterday and switched out all of the winter clothes with my spring clothes... and I also decided to try on everything that did not fit last summer, or I've been holding on to in the hopes of fitting into again someday. I tried on a skirt that I bought in college that hasn't fit me for a long time, and sure enough... it fit. I was and am pretty dang excited. All of my shorts and capris that didn't fit last summer, now fit too. It was a really, really good feeling. I'm also happy to report that b) It's opening day for the Detroit Tigers (go Tigers!) and c) It's Pinspired Friday!


It all started when I ran across this pin:

From WhoSay.com - http://www.whosay.com/joybauer/photos/233971
The pin was for a green tea mango smoothie, with a promise of yummy and energy, both of which I enjoy. I had all the ingredients on hand, so I decided to give it a try. And you should too!


You'll need:
• 1 Green tea teabag, to be steeped in 6 oz. of water
• 1/2 cup of nonfat/fat free vanilla yogurt
• 1 cup of frozen mango chunks, unsweetened
• Not pictured - 7 ice cubes
• Not pictured - 1 packet of splenda

You'll also want:
• a blender
• a Pyrex or similar measuring cup to get the water boiling/hot

First, measure out 6 oz. of water in your measuring cup, and microwave it for about 3 minutes or until hot/near boiling. Stick your green tea bag in there after the water is ready.


We want the water to become quite saturated with the green tea, so let it sit for about 5 minutes.


As the tea is steeping, measure out your one cup of frozen mango:


Add the mango the blender, add your 1/2 cup of nonfat vanilla yogurt, add the green tea, add the packet of splenda and the ice cubes.

Add your blender top before blending, obviously... haha
Blend until all chunks are broken down and the mixture is smooth.


And enjoy! This recipe makes one glass full (these glasses are full size, I believe in the 14-16 oz range). The color is gorgeous, almost like an orange juice color but more yellow, and the taste is great! I was unsure if I was going to care for it as I usually don't care for green tea (I prefer black tea or even better, white tea) but the combination of the exotic taste of mango and the green tea work together really well. The original pin I got this front said the glass had 190 calories... not bad for breakfast! :) Thanks for following along!

I'm linking up to these parties!
Thrifty Decor Chick

Friday, March 22, 2013

It's Pinspired Friday! {Sweet Potato Hash Browns}

It's Friday, so that only means two things: the weekend is here...and more importantly, it's time for Pinspired Friday. ;)

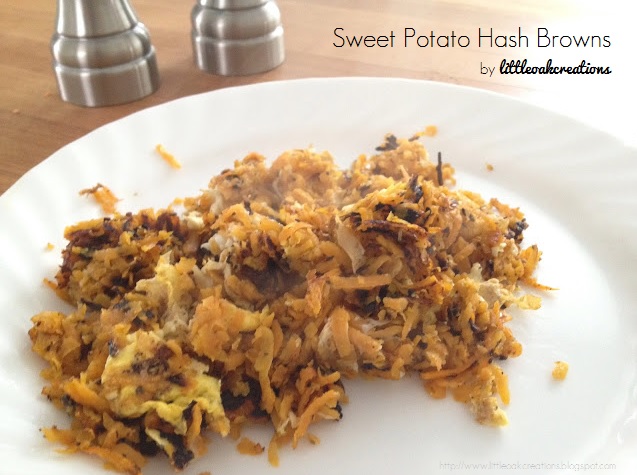
The steam made for kind of a crappy picture... but I ate them too fast to retake. ;)


Today, we're making sweet potato hash browns. If you haven't been reading lately (don't break my heart!), we've been following Bob Harper's "The Skinny Rules" as our new way of life/diet. In his book, he has a recipe for sweet potato hash browns. I was looking for something yummy to serve our lovely house guests this weekend for breakfast... and I remembered the recipe for sweet potato hash browns in the book.

Fast forward a little bit... and I'm mildly confused. By reading through the recipe, it's clearly not for hashbrowns, but rather sweet potato home fries if anything... it was just cubed sweet potatoes. And if you've ever cooked sweet potatoes, you know they take a long time to cook. Cue sad face.  A quick search around Pinterest brought me to these actual, sweet potato hash browns.

Sweet Potato Hash Browns from nomnompaleo
Here is the biggest plus about these... other than the fact that they taste amazing and are lower calorie, and paleo diet approved - they take only a few minutes to cook! Because you shred them small, they cook way faster. Like less than ten minutes. That's my kinda food!

Not pictured... an egg (optional!)

So let's make you some! Here's what you'll need.
• 1 sweet potato. I used a really small one (like 2" wide and maybe 6" long) and it is plenty for one person, could be two small portions.
• olive oil
• salt
• black pepper
• onion powder
• garlic powder
• Herbs De Provence - these are the kicker - these give this dish a totally unmatched flavor. Herbs De Provence is a mix of basil, marjoram, thyme, sage, savory, and rosemary.
• An egg (optional)

You'll also want:
• A stovetop
• A frying pan with lid.
• A peeler and a grater or food processor with julienne setting.


First, get some oil to shimmering in a fry pan. I just eyeballed this - I wanted enough to give my sweet potatoes a little crisp and not stick to the pan.


Peel and shred your sweet potato. That little potato made all of this!

Attempt not to maim yourself with the shredder. Nice job.


Now, place your shredded sweet potatoes in the pan, they'll sizzle a little and immediately start turning a different shade of orange. Top them with the salt, pepper, herbs de provence, garlic powder and onion powder. With a spatula, flip them and mix them so they all get a bit of spice and start cooking.

Place your lid on top and let them cook a little. Don't be like me and walk away... otherwise the crispy parts become burnt, and it's not the same.

They'll turn a different shade of orange as they cook, and you want them to cook to the bottom a little so they get crispy but not burnt, so watch them carefully.


Remove some of the burnt pieces and toss them. Whoops. If you want, you can crack an egg at this point in the same pan and mix it in with the sweet potato. OMG. So good.

Remove them to plate when your egg is sufficiently cooked to your liking, or if you're not doing an egg, you can remove them pretty shortly after they turn all the same color and are slightly mushy and slightly crispy.


Aww yeah, so good. Serve them right away, as they get cold quick and they taste best when warm.

Thanks for following along!

I'm linking up to these parties!


Friday, February 8, 2013

It's Pinspired Friday! {Apple Cinnamon Burritos}


It's...


Hey all! I've got a recipe that is to. die. for. today! My sister-in-law and I were searching for the perfect afternoon snack one day and came across this recipe for Cinnamon Apple Dessert Chimichangas. We wanted something that was easy, and that we didn't have to make a grocery run for! ;)

Enter...Apple Cinnamon Burritos!


Cinnamon Apple Dessert Chimichangas from Juanita's Cocina


We cut the recipe in half because I was low on cornstarch, which is one of those that it seems like you have forever and then poof you are suddenly without! It still made about 10 good sized burritos, which was plenty for everyone to get a taste. Or to sneak two burritos, like my SIL and I did. Ha! :)

So first, let's gather our ingredients:

For the apple pie filling:
• 3 apples, peeled and diced. We used Granny Smith apples.
• 3/4 cup of water
• 1/8 cup of cornstartch
• 3/8 cup of sugar
• 1/4 tsp. of cinnamon
• 1/8 teaspoon of salt
• 1/2 tablespoon of lemon juice

For the burritos:
• 5 burrito sized tortillas, cut in half
• 1/2 cup of sugar
• 1 tablespoon of cinnamon
• Vegetable oil for frying

You're also going to want:
• A saucepan
• A fry pan
• A shallow bowl

First, let's peel and dice our apples. As you can see, a little skin was left on but not much.

Combine the water, cornstartch, sugar, cinnamon, salt and lemon juice in a saucepan and bring it to a boil. We want it super thick, almost like caramel. 


Combined... and now get your mixture to look like this:
Now, add your chopped apples to the mixture and stir them in. Reduce the mixture to a simmer and stir the apples every few minutes. We want the apples to be softened, but not gooey, so about 10-15 minutes.

While this is going down... cut up your burrito sized tortillas in half if you have not already done so. Grab your fry pan and get the oil hot. Also, combine your cinnamon and sugar in a bowl.

Once your oil is hot, and you've let your apples simmer for about 10-15 minutes, let the filling cool slightly so you don't burn yourself, but not cool enough to congeal. We don't want to be putting basically applesauce in the burritos, we want that savory caramel taste and texture. Wrap the burritos with the filling inside, and place into the oil. You'll want to wrap them pretty tightly so the insides don't escape.

Fry them until the tortilla turns brown, flipping it with a spatula or tongs until all sides are browned. We knocked off any excess oil and then threw them in the sugar/cinnamon mix as each one completed, but if you want less oil, you can transfer them to a towel lined plate to absorb any excess oil. The way we did it made the cinnamon/sugar stay on the burrito nicely, so that's what I would recommend.  


Put them all on a platter and ENJOY! These left everyone wanting more! Thanks for following along and thank you to Juanita's Cocina for the inspiration!


Wednesday, December 19, 2012

Sausage-Cheese Balls {A slightly healthier adaptation!}

Good morning! Today I'm sharing a recipe that is tried and true. It is Betty Crocker's Sausage-Cheese Balls - but I've adapted them to make them slightly healthier, and I think they still taste the same as the original recipe. We really don't eat only sausage around here, I promise... haha... this is my third recipe so far on this blog featuring sausage! Whoops. ;)

I read on one of the websites describing this recipe that there has been two different verisions that Ms. Crocker has put out - one is a "1-2-3" version, where you use 1 lb of sausage, 2 cups of cheese, 3 cups of Bisquick, but somewhere along the line they changed it to "1-4-3" - 1 lb of sausage, 4 cups of cheese, and 3 cups of Bisquick. More cheese? Betty, you're a-okay in my book. ;)

But today, we're throwing that out the window in favor of something a little different. We're doing a "24-3ish-3" - 24oz, 3-ish cups of cheese and 3 cups of Bisquick. I'm not going to tote these as health food, but we're going to try to make these not so sinful (because you really can't stop at just 1 or 2!) We're also going to adapt the recipe in a way that makes this awesome for large family gatherings or office parties. We're going to roll about 150 meatballs! (yay?!). It's also a relatively cheap recipe if you can get a store brand "Bisquick" and a sale on sausage rolls.


Alright, so let's gather our ingredients:
• 3 cups Original Bisquick mix or a store brand baking mix works just as well. (I was able to get a big box of the store brand for $2 something vs. $4 something for the Bisquick brand.)
• 24 oz. (2 packages) of the Jimmy Dean "Reduced Fat" sausage ($3/for 2! yay)
• 3 "ish"* cups of colby or cheddar. Cheddar will make it a bit zingy-er.
• 1/2 cup grated Parmesan cheese
• 1/2 cup milk (I used 2%)
• 1/2 teaspoon dried rosemary leaves, crushed
• 1 1/2 teaspoons chopped fresh parsley or 1/2 teaspoon parsley flakes (I used the parsley flakes)
• If you're using the Jimmy Dean's reduced fat sausage, add about 1/2 teaspoon of powdered sage and/or a dash of oregano. If you're using a sausage roll with sage or other herbs in it, you wont need this.

You'll also want:
• Barbecue sauce or chili sauce, if desired. Ranch is pretty yummy too.
• A big mixing bowl
• 2 cookie sheets
• Pam Spray
• An oven
• A crockpot if you're taking them somewhere - a bowl if you're not taking them anywhere.

*I say "ish" because I had to shred my cheese... and I kind of eyeballed it. Bad blogger. This is thankfully one of those recipes where you really can't screw this up though... as long as you're around 2-3 cups you're good. 4 cups seems excessive.

Spray your cookie sheets with Pam Spray. This is a good time to preheat your oven to 350º.

Mix all ingredients into the mixing bowl. Don't attempt to mix this with a spoon - the best and easiest way to incorporate all of the ingredients is to use your hands. And about half way through you're going to freak out and think that this is too much baking mix!! It's not - it just takes a LONG time to incorporate it completely. Mix it up until it looks like my picture. And those are parsley flakes, not mold... I just realized that picture looks a little weird!


 Now, the (fun?) part begins. We're going to roll what feels like a billion sausage balls. The original recipe calls for them to be about an 1" - I rolled them to closer to 1/2-3/4", so slightly smaller to stretch them farther. I got 60 balls on this tray, 54 on another, and about 50 on another - so about 164 sausage balls.

Put your first tray in the oven. Cook for 25 minutes at 350º. While that one is cooking, make up another tray. You could probably cook both trays at the same time but I'm not sure what that would do with the cooking time. Once that first tray is done cooking and they've cooled for a minute or two, put in your second tray. Remove the first batch off the tray into a crockpot or bowl, and give that first tray a new coat of Pam spray. Make your third batch on this tray.

Cook your second tray 25 minutes, remove after 25 and after letting them cool for a minute, remove them to the crockpot or bowl. Place your third tray, 25 minutes and repeat until all sausage balls have cooked.

Now, some people like to immerse these and cover them in BBQ sauce - they are good that way, but if you're feeding them to an office crowd for example, put the BBQ on the side just in case someone doesn't care for BBQ.

Otherwise, they are yummy just the way they are! Serve them on toothpicks for extra fancy-ness. ;) So there you have it! Slightly healthier using the reduced fat sausage and they still taste great.

Did you love it? Share it with others and pin it to Pinterest! I'd appreciate it. :)

Sausage-Cheese Balls {A slightly healthier adaptation!}
Original recipe from Betty Crocker
Ingredients:
• 3 cups Original Bisquick mix or a store brand baking mix works just as well.
• 24 oz. (2 packages) of the Jimmy Dean "Reduced Fat" sausage
• 3 "ish"* cups of colby or cheddar.
• 1/2 cup grated Parmesan cheese
• 1/2 cup milk
• 1/2 teaspoon dried rosemary leaves, crushed
• 1 1/2 teaspoons chopped fresh parsley or 1/2 teaspoon parsley flakes
• If you're using the Jimmy Dean's reduced fat sausage, add about 1/2 teaspoon of powdered sage and/or a dash of oregano. If you're using a sausage roll with sage or other herbs in it, you wont need this.

Directions:
1. Heat oven to 350º. Lightly grease 2-3 baking pans with Pam spray or other greasing agent.
2. Mix all ingredients together in a large mixing bowl with hands. Shape mixture into 1/2"-3/4" balls. Place in pan.
3. Bake 25 minutes or until brown. Immediately remove from pan and place in bowl or crockpot. Serve warm with BBQ sauce or other sauce for dipping.
Yields about 150 mini-sausage balls.
Showing posts with label breakfast. Show all posts

Wednesday, March 25, 2015

The Best Biscuits and Gravy Recipe

"The best" is a pretty big claim, eh?
I'd put this recipe right up there with the best. It's a pretty easy recipe as long as you have all of the ingredients.

Chances are if you've stayed over at the LOC house, you've been served these the next morning. It's my go-to recipe for feeding about 4 adults because it's so hearty and such an unforgettable meal. The taste is great by itself, or add a bit of hot sauce for dimension.


"The Best" Biscuits and Gravy Recipe
 (Yields about 4 adult servings)

You'll need...
  • 2 1/4 cups of flour total (2 for biscuits, 1/4 for gravy)
  • 2 1/2 teaspoons of baking powder (not baking soda!)
  • 1/2 teaspoon of salt and more for the gravy (1/2 t for the biscuits, to your liking for gravy)
  • 1 Tablespoon of sugar
  • 1/2 cup of butter, diced (1 stick)
  • 3 3/4 cups of milk (1 1/4 cups of milk for biscuits, 2 1/2 for gravy)
  • 1 loaf of sausage, thawed if frozen
  • Black pepper to taste 

1) Preheat oven to 450.
2) In a bowl, mix 2 cups flour, 2 1/2 tea. baking powder, 1/2 tea. salt, and 1 Tbl. sugar in a bowl.Once mixed, cut your butter up into small cubes, and cut it into the mixture. I often use my hands for this part to get all of the butter mixed in. It should look like crumbs once it's mixed in. Not everything will be covered in butter.
3) Slowly add 1 1/4 cups of milk to the dry goods mixture. Stir as you pour.

4) Now, drop spoonfuls of the batter to an ungreased cookie sheet. By this time, your oven should be close to preheating or already there. Place the biscuits in, now it's time to make the sausage gravy.

5) Place the sausage loaf in a pot. Brown the sausage, crumbling it as you go.


6) Once all brown and crumbled, add the 1/4 cup of flour to the sausage. Stir to coat.

7) Gradually stir in the 2 1/2 cups of milk. Add salt to your taste (I would start with 1 teaspoon and go from there) and black pepper to taste. Let the mixture come to a boil, then reduce heat and let the gravy simmer for about 2 minutes.

8) By about this time, your biscuits should be ready! Let both cool for a minute or two, then enjoy!


Wednesday, July 10, 2013

Wake-Up Waffles {A Low Calorie Breakfast!}

Waffles. Peanut butter. Bananas. How 'come I've never thought of the three put together before?

In the eternal struggle of "weight loss," I've been searching for easy breakfasts that are low in calories, taste great, and are quick and easy to prepare. I work much closer to an Aldi's now and I love that they have a "Fit and Active" line of foods that are inexpensive AND are healthier options, so I've been giving that a go. So far, everything has tasted really, really good, and these waffles were no exception. 

Introducing... Wake Up Waffles! (clever, eh?)

This whole Wake Up Waffle has only 213 calories for one and packs six grams of protein! Ready to make your own? You'll need:

• A half of a banana
• 1 tbsp of peanut butter
• 1 multigrain waffle 

You'll also want:
• A toaster oven (or toaster)
• A butter knife


Prepare your waffle as directed (I toasted mine in the toaster oven). When it's complete, smear a tablespoon of peanut butter ( I eyeball it, and probably used less than a tablespoon), and slice your bananas, setting them atop the waffle.


Easy and so tasty! The banana's stick pretty well to the peanut butter so you could possibly make this grab and go, too! Thanks for following along, enjoy!


Monday, June 3, 2013

Apple Walnut Cake

Hi all! It's been a quiet May around here and I hope to be posting a little more in June as I get into more of a routine.

Today I am making Apple Walnut Cake, a recipe that I found originally in the Glycemic Index Cookbook. This cookbook is actually one my mother picked up for me at a yard sale, and man, there are some gorgeous low GI recipes that actually look pretty do-able and don't have a million ingredients, AND look yummy.


This recipe was good - just enough sweetness to silence that sweet tooth, but not enough to leave you craving eating the rest of the pan. Does that make sense? Sometimes I feel "I can't get enough!" when something is ultra sweet and I want more... where this recipe is just enough. It's not ultra rich where you feel "bleckk" the rest of the night, either. Although, I highly recommend just a HINT of vanilla ice cream... :)

Ingredients:
3/4 cup of all-purpose flour
2 teaspoons of baking powder
1 1/2 teaspoons apple pie spice
3/4 teaspoon salt
2 1/2 cups chopped sliced Granny Smith apples (they said that's two large apples, it took me four.)
1/4 cup plus 2 tablespoons packed brown sugar
3/4 cup sugar substitute. (I mix my regular sugar with my Splenda-like sugar substitute, so I didn't use just straight up sugar substitute.
4 1/2 tablespoons of margarine or butter, melted. (I used margarine, next time I would use butter.)
3/4 cup fat-free/skim milk
3 eggs
1 1/2 teaspoons vanilla
1/2 cup chopped walnuts

You'll also want:
A large mixing bowl
An 8x8 glass pan
A large Pyrex type measuring cup. I used the 4 cup version.

First, preheat your oven to 350. Just a heads up - this recipe takes 50 minutes to cook, so don't make this recipe if you want "instant" results ;) While you're at it, spray a 8x8 glass pan with cooking spray.


Combine flour, baking powder, apple pie spice and salt in a bowl. Use a larger bowl, as you'll be mixing in this later.

Slice your apples and dump them in the prepared baking pan. Using the large Pyrex measuring cup, beat the brown sugar, the sugar sub, and melted margarine until well blended. My suggestion: once you've got the apples out of the measuring cup, melt the margarine in the measuring cup, then add the sugars. No sense in getting other dishes dirty!

Now, once the margarine and sugars are mixed, whisk in milk, eggs and vanilla, mix until smooth. Then, dump this mixture into your awaiting flour bowl from earlier. Stir until smooth.


Pour the mixture over the apples. Sprinkle the walnuts over the batter.


Bake 45 to 55 minutes or until knife inserted in the center comes clean. Let it cool for 10 minutes when it comes out. Serve warm, and refrigerate leftovers.


Hope you enjoyed! This makes 9 servings and has 204 calories per serving, 23g of carbohydrates, 12g fat, 2g Saturated fat, 2 grams of fiber. Thanks for following along!

Friday, April 5, 2013

It's Pinspired Friday! {Green Tea Mango Smoothies}

Good morning all!

I am happy to report that a) I am down 2 pants/skirts sizes as of yesterday. I had a sudden BURST of energy yesterday and switched out all of the winter clothes with my spring clothes... and I also decided to try on everything that did not fit last summer, or I've been holding on to in the hopes of fitting into again someday. I tried on a skirt that I bought in college that hasn't fit me for a long time, and sure enough... it fit. I was and am pretty dang excited. All of my shorts and capris that didn't fit last summer, now fit too. It was a really, really good feeling. I'm also happy to report that b) It's opening day for the Detroit Tigers (go Tigers!) and c) It's Pinspired Friday!


It all started when I ran across this pin:

From WhoSay.com - http://www.whosay.com/joybauer/photos/233971
The pin was for a green tea mango smoothie, with a promise of yummy and energy, both of which I enjoy. I had all the ingredients on hand, so I decided to give it a try. And you should too!


You'll need:
• 1 Green tea teabag, to be steeped in 6 oz. of water
• 1/2 cup of nonfat/fat free vanilla yogurt
• 1 cup of frozen mango chunks, unsweetened
• Not pictured - 7 ice cubes
• Not pictured - 1 packet of splenda

You'll also want:
• a blender
• a Pyrex or similar measuring cup to get the water boiling/hot

First, measure out 6 oz. of water in your measuring cup, and microwave it for about 3 minutes or until hot/near boiling. Stick your green tea bag in there after the water is ready.


We want the water to become quite saturated with the green tea, so let it sit for about 5 minutes.


As the tea is steeping, measure out your one cup of frozen mango:


Add the mango the blender, add your 1/2 cup of nonfat vanilla yogurt, add the green tea, add the packet of splenda and the ice cubes.

Add your blender top before blending, obviously... haha
Blend until all chunks are broken down and the mixture is smooth.


And enjoy! This recipe makes one glass full (these glasses are full size, I believe in the 14-16 oz range). The color is gorgeous, almost like an orange juice color but more yellow, and the taste is great! I was unsure if I was going to care for it as I usually don't care for green tea (I prefer black tea or even better, white tea) but the combination of the exotic taste of mango and the green tea work together really well. The original pin I got this front said the glass had 190 calories... not bad for breakfast! :) Thanks for following along!

I'm linking up to these parties!
Thrifty Decor Chick

Friday, March 22, 2013

It's Pinspired Friday! {Sweet Potato Hash Browns}

It's Friday, so that only means two things: the weekend is here...and more importantly, it's time for Pinspired Friday. ;)

The steam made for kind of a crappy picture... but I ate them too fast to retake. ;)


Today, we're making sweet potato hash browns. If you haven't been reading lately (don't break my heart!), we've been following Bob Harper's "The Skinny Rules" as our new way of life/diet. In his book, he has a recipe for sweet potato hash browns. I was looking for something yummy to serve our lovely house guests this weekend for breakfast... and I remembered the recipe for sweet potato hash browns in the book.

Fast forward a little bit... and I'm mildly confused. By reading through the recipe, it's clearly not for hashbrowns, but rather sweet potato home fries if anything... it was just cubed sweet potatoes. And if you've ever cooked sweet potatoes, you know they take a long time to cook. Cue sad face.  A quick search around Pinterest brought me to these actual, sweet potato hash browns.

Sweet Potato Hash Browns from nomnompaleo
Here is the biggest plus about these... other than the fact that they taste amazing and are lower calorie, and paleo diet approved - they take only a few minutes to cook! Because you shred them small, they cook way faster. Like less than ten minutes. That's my kinda food!

Not pictured... an egg (optional!)

So let's make you some! Here's what you'll need.
• 1 sweet potato. I used a really small one (like 2" wide and maybe 6" long) and it is plenty for one person, could be two small portions.
• olive oil
• salt
• black pepper
• onion powder
• garlic powder
• Herbs De Provence - these are the kicker - these give this dish a totally unmatched flavor. Herbs De Provence is a mix of basil, marjoram, thyme, sage, savory, and rosemary.
• An egg (optional)

You'll also want:
• A stovetop
• A frying pan with lid.
• A peeler and a grater or food processor with julienne setting.


First, get some oil to shimmering in a fry pan. I just eyeballed this - I wanted enough to give my sweet potatoes a little crisp and not stick to the pan.


Peel and shred your sweet potato. That little potato made all of this!

Attempt not to maim yourself with the shredder. Nice job.


Now, place your shredded sweet potatoes in the pan, they'll sizzle a little and immediately start turning a different shade of orange. Top them with the salt, pepper, herbs de provence, garlic powder and onion powder. With a spatula, flip them and mix them so they all get a bit of spice and start cooking.

Place your lid on top and let them cook a little. Don't be like me and walk away... otherwise the crispy parts become burnt, and it's not the same.

They'll turn a different shade of orange as they cook, and you want them to cook to the bottom a little so they get crispy but not burnt, so watch them carefully.


Remove some of the burnt pieces and toss them. Whoops. If you want, you can crack an egg at this point in the same pan and mix it in with the sweet potato. OMG. So good.

Remove them to plate when your egg is sufficiently cooked to your liking, or if you're not doing an egg, you can remove them pretty shortly after they turn all the same color and are slightly mushy and slightly crispy.


Aww yeah, so good. Serve them right away, as they get cold quick and they taste best when warm.

Thanks for following along!

I'm linking up to these parties!


Friday, February 8, 2013

It's Pinspired Friday! {Apple Cinnamon Burritos}


It's...


Hey all! I've got a recipe that is to. die. for. today! My sister-in-law and I were searching for the perfect afternoon snack one day and came across this recipe for Cinnamon Apple Dessert Chimichangas. We wanted something that was easy, and that we didn't have to make a grocery run for! ;)

Enter...Apple Cinnamon Burritos!


Cinnamon Apple Dessert Chimichangas from Juanita's Cocina


We cut the recipe in half because I was low on cornstarch, which is one of those that it seems like you have forever and then poof you are suddenly without! It still made about 10 good sized burritos, which was plenty for everyone to get a taste. Or to sneak two burritos, like my SIL and I did. Ha! :)

So first, let's gather our ingredients:

For the apple pie filling:
• 3 apples, peeled and diced. We used Granny Smith apples.
• 3/4 cup of water
• 1/8 cup of cornstartch
• 3/8 cup of sugar
• 1/4 tsp. of cinnamon
• 1/8 teaspoon of salt
• 1/2 tablespoon of lemon juice

For the burritos:
• 5 burrito sized tortillas, cut in half
• 1/2 cup of sugar
• 1 tablespoon of cinnamon
• Vegetable oil for frying

You're also going to want:
• A saucepan
• A fry pan
• A shallow bowl

First, let's peel and dice our apples. As you can see, a little skin was left on but not much.

Combine the water, cornstartch, sugar, cinnamon, salt and lemon juice in a saucepan and bring it to a boil. We want it super thick, almost like caramel. 


Combined... and now get your mixture to look like this:
Now, add your chopped apples to the mixture and stir them in. Reduce the mixture to a simmer and stir the apples every few minutes. We want the apples to be softened, but not gooey, so about 10-15 minutes.

While this is going down... cut up your burrito sized tortillas in half if you have not already done so. Grab your fry pan and get the oil hot. Also, combine your cinnamon and sugar in a bowl.

Once your oil is hot, and you've let your apples simmer for about 10-15 minutes, let the filling cool slightly so you don't burn yourself, but not cool enough to congeal. We don't want to be putting basically applesauce in the burritos, we want that savory caramel taste and texture. Wrap the burritos with the filling inside, and place into the oil. You'll want to wrap them pretty tightly so the insides don't escape.

Fry them until the tortilla turns brown, flipping it with a spatula or tongs until all sides are browned. We knocked off any excess oil and then threw them in the sugar/cinnamon mix as each one completed, but if you want less oil, you can transfer them to a towel lined plate to absorb any excess oil. The way we did it made the cinnamon/sugar stay on the burrito nicely, so that's what I would recommend.  


Put them all on a platter and ENJOY! These left everyone wanting more! Thanks for following along and thank you to Juanita's Cocina for the inspiration!


Wednesday, December 19, 2012

Sausage-Cheese Balls {A slightly healthier adaptation!}

Good morning! Today I'm sharing a recipe that is tried and true. It is Betty Crocker's Sausage-Cheese Balls - but I've adapted them to make them slightly healthier, and I think they still taste the same as the original recipe. We really don't eat only sausage around here, I promise... haha... this is my third recipe so far on this blog featuring sausage! Whoops. ;)

I read on one of the websites describing this recipe that there has been two different verisions that Ms. Crocker has put out - one is a "1-2-3" version, where you use 1 lb of sausage, 2 cups of cheese, 3 cups of Bisquick, but somewhere along the line they changed it to "1-4-3" - 1 lb of sausage, 4 cups of cheese, and 3 cups of Bisquick. More cheese? Betty, you're a-okay in my book. ;)

But today, we're throwing that out the window in favor of something a little different. We're doing a "24-3ish-3" - 24oz, 3-ish cups of cheese and 3 cups of Bisquick. I'm not going to tote these as health food, but we're going to try to make these not so sinful (because you really can't stop at just 1 or 2!) We're also going to adapt the recipe in a way that makes this awesome for large family gatherings or office parties. We're going to roll about 150 meatballs! (yay?!). It's also a relatively cheap recipe if you can get a store brand "Bisquick" and a sale on sausage rolls.


Alright, so let's gather our ingredients:
• 3 cups Original Bisquick mix or a store brand baking mix works just as well. (I was able to get a big box of the store brand for $2 something vs. $4 something for the Bisquick brand.)
• 24 oz. (2 packages) of the Jimmy Dean "Reduced Fat" sausage ($3/for 2! yay)
• 3 "ish"* cups of colby or cheddar. Cheddar will make it a bit zingy-er.
• 1/2 cup grated Parmesan cheese
• 1/2 cup milk (I used 2%)
• 1/2 teaspoon dried rosemary leaves, crushed
• 1 1/2 teaspoons chopped fresh parsley or 1/2 teaspoon parsley flakes (I used the parsley flakes)
• If you're using the Jimmy Dean's reduced fat sausage, add about 1/2 teaspoon of powdered sage and/or a dash of oregano. If you're using a sausage roll with sage or other herbs in it, you wont need this.

You'll also want:
• Barbecue sauce or chili sauce, if desired. Ranch is pretty yummy too.
• A big mixing bowl
• 2 cookie sheets
• Pam Spray
• An oven
• A crockpot if you're taking them somewhere - a bowl if you're not taking them anywhere.

*I say "ish" because I had to shred my cheese... and I kind of eyeballed it. Bad blogger. This is thankfully one of those recipes where you really can't screw this up though... as long as you're around 2-3 cups you're good. 4 cups seems excessive.

Spray your cookie sheets with Pam Spray. This is a good time to preheat your oven to 350º.

Mix all ingredients into the mixing bowl. Don't attempt to mix this with a spoon - the best and easiest way to incorporate all of the ingredients is to use your hands. And about half way through you're going to freak out and think that this is too much baking mix!! It's not - it just takes a LONG time to incorporate it completely. Mix it up until it looks like my picture. And those are parsley flakes, not mold... I just realized that picture looks a little weird!


 Now, the (fun?) part begins. We're going to roll what feels like a billion sausage balls. The original recipe calls for them to be about an 1" - I rolled them to closer to 1/2-3/4", so slightly smaller to stretch them farther. I got 60 balls on this tray, 54 on another, and about 50 on another - so about 164 sausage balls.

Put your first tray in the oven. Cook for 25 minutes at 350º. While that one is cooking, make up another tray. You could probably cook both trays at the same time but I'm not sure what that would do with the cooking time. Once that first tray is done cooking and they've cooled for a minute or two, put in your second tray. Remove the first batch off the tray into a crockpot or bowl, and give that first tray a new coat of Pam spray. Make your third batch on this tray.

Cook your second tray 25 minutes, remove after 25 and after letting them cool for a minute, remove them to the crockpot or bowl. Place your third tray, 25 minutes and repeat until all sausage balls have cooked.

Now, some people like to immerse these and cover them in BBQ sauce - they are good that way, but if you're feeding them to an office crowd for example, put the BBQ on the side just in case someone doesn't care for BBQ.

Otherwise, they are yummy just the way they are! Serve them on toothpicks for extra fancy-ness. ;) So there you have it! Slightly healthier using the reduced fat sausage and they still taste great.

Did you love it? Share it with others and pin it to Pinterest! I'd appreciate it. :)

Sausage-Cheese Balls {A slightly healthier adaptation!}
Original recipe from Betty Crocker
Ingredients:
• 3 cups Original Bisquick mix or a store brand baking mix works just as well.
• 24 oz. (2 packages) of the Jimmy Dean "Reduced Fat" sausage
• 3 "ish"* cups of colby or cheddar.
• 1/2 cup grated Parmesan cheese
• 1/2 cup milk
• 1/2 teaspoon dried rosemary leaves, crushed
• 1 1/2 teaspoons chopped fresh parsley or 1/2 teaspoon parsley flakes
• If you're using the Jimmy Dean's reduced fat sausage, add about 1/2 teaspoon of powdered sage and/or a dash of oregano. If you're using a sausage roll with sage or other herbs in it, you wont need this.

Directions:
1. Heat oven to 350º. Lightly grease 2-3 baking pans with Pam spray or other greasing agent.
2. Mix all ingredients together in a large mixing bowl with hands. Shape mixture into 1/2"-3/4" balls. Place in pan.
3. Bake 25 minutes or until brown. Immediately remove from pan and place in bowl or crockpot. Serve warm with BBQ sauce or other sauce for dipping.
Yields about 150 mini-sausage balls.

Labels

Flickr Images

Like us on Facebook

Popular Posts


Little Oak Creations Template by Ipietoon Cute Blog Design

Blogger Templates