Showing posts with label easy. Show all posts

Thursday, July 4, 2013

Happy 4th of July and Rhubarb Pie

Hi all and Happy 4th of July! Where has this summer gone?

Around the middle/end of June, I spied that my rhubarb plant had taken off and had given me a bunch of nice, new stems. Both of our rhubarb plants caught some sort of blight-like disease last year and we ended up not having rhubarb very long. So when I saw that the plant (only one came back :( ) had given me enough for a pie... I ran out there with kitchen scissors like a mad man (not really, running with scissors is not recommended. But I did get out there pretty darn quick.)

Now I haven't always been a fan a rhubarb, although like many children, I never gave it a chance either. In our first summer of living here, I gave it a shot and I was hooked. This is the recipe I never waver from because it is that good.

Rhubarb really can shine alone without the help of strawberries or other fruits. When you pack it with enough sugar, it evens out the extreme tart of rhubarb and creates a sweet and slightly tart pie that is really good warm, but even better cold in my opinion... which makes it the perfect pie for picnics.

Ready to make your own? You'll need:
• 4 cups of chopped rhubarb. (This is where I waver only a little... I think I had only about 2 3/4 cups of rhubarb when I was all said and done. This makes for a still tasty pie but 4 cups would definitely make for a thicker pie.) This requires a LOT of stems to get to 4 cups - pictured below is roughly 2 3/4 cup.
• 1 1/3 cups white sugar
• 6 tablespoons all purpose flour
• 1 tablespoon butter (real salted butter, not margarine)
• A 2 pack of premade pie crusts, you'll use both.

You'll also need:
• a pie plate
• a large measuring cup (up to four cup)
• cutting board/knife
• mixing bowl

First, preheat your oven to 450 degrees. Chop the leafs off and the wide bottoms off as well. Make sure to discard the leaves properly, especially if you have pets and small children as they can be quite poisonous if ingested... but the stems are good to go.


Rinse them off, pat them dry. Chop the rhubarb into small slices - the smaller the better, as they'll cook down the best this way.


In a mixing bowl, combine the sugar and flour. In in your pie plate, unroll a pie crust and set in the bottom of the pie plate. The pie plate doesn't require greasing before you put your crust in.


Sprinkle about a 1/4 of your flour and sugar mix on top of the crust. This doesn't have to be exactly 1/4 of your mixture, just eyeball it. Heap the rhubarb on top of the mixture in the pie plate, and then sprinkle the remaining sugar and flour on top of the rhubarb.

Take your tablespoon of butter and chop it into little pieces. Dot the butter randomly on top of the mixture. It should look something like this:


Cover with the remaining crust and pinch the sides together. Make some fancy slices in the top to be...well, fancy. (This actually helps some steam escape, but it looks nice too.)

Place your pie in the oven and bake at 450 for 15 minutes. After 15 minutes has completed, reduce the temperature to 350 and continue baking for 40 to 45 minutes. Do keep an eye on your crust... sometimes I have to place some tinfoil around the edges if they start to brown too much. Serve warm or cold, with vanilla ice cream is the best! :)


Thanks for following along! Have you ever had rhubarb pie? Have you had it before but with strawberries in it? Share your stories in the comments and share this recipe with your friends -- or don't and blow everyone's minds with this amazing recipe at your next picnic! Have a safe and happy 4th of July!


Friday, March 15, 2013

It's Pinspired Friday! {Chocolate Frozen Yogurt}

I say this every week... but really, can you believe it's Friday again? Already? Let's chat about Chocolate Frozen Yogurt today.


If you look at the history of this blog, you know I'm a fan of sweets. As in, I love sugar. Part of this new diet/lifestyle change is really reducing your sugar intake, and he really wants us to stay away from artificial sweeteners. Bob, I love all of your other suggestions...but this one has been toughest for me. Getting rid of soda/pop - fine, we don't drink it anyway (which impressed my dentist yesterday, btw. Lighten up on the pop for smaller waistlines AND better teeth. Go figure). Have an apple a day? Okay, I heart apples so I can do that. But sugar...? Bobbbbbb...*whine*

I know I have to cut it out though if I want to lose anything, so I did. For the most part. We bought Greek yogurt plain, and I have to put a little Splenda in it. It's just too bitter otherwise for me, as in FULL BODY REJECTION to the taste and texture. Blergh. Makes me shiver just thinking about it. 

So when I ran across this pin (actually, I think I pinned it from my sister-in-law. Thanks girl! :) I wanted to give it a try because I really do want to like Greek yogurt. I want to give it a chance and man, did I want some chocolate.

Rich Chocolate Protein FroYo from Muffin-Topless (haha, love that name)
I am happy to report - it wasn't bad. At all. In fact, it was pretty dang good. Of course, I made a few modifications... but they're along the same line and idea as Muffin-Topless.

Want to make some? Here's what you'll need.

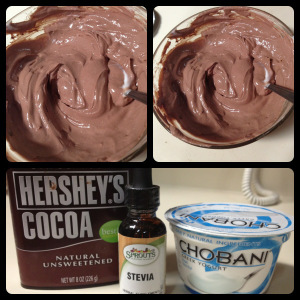
• 6 oz. (a little less than a cup... I used about half of the container and it was plenty for Mr. LOC and I to share) of Greek Yogurt, plain.
• 2 Tablespoons of baking cocoa
• 3 packets of Splenda (I didn't have Stevia... and even though I'm only showing 2 packets, it needed 3)
• A dash of vanilla extract

I added the vanilla extract to the recipe, as it was still lacking after mixing up the other ingredients. If you use the vanilla flavored Greek Yogurt, you can omit this step.


Add your Greek yogurt to a bowl. I recommend using glass like Corelle so you don't get that plastic-y taste after you freeze it later. Nothing worse than plastic-y tasting sort-of ice cream (plus, that plastic taste is not good for you!)


Add the 2 tablespoons of baking cocoa, the three packets of Splenda, and the dash of vanilla. Mix thoroughly.

Take out the spoon, cling-wrap it and toss it in the freezer. It's an easy low calorie "dessert" at night!

Hope you enjoy! Let me know how this turned out for you! Spring is just around the corner (thank God). Next week I've got a salad recipe you won't want to miss and another offer for the Etsy store just for my loyal readers! See you then!
I'm linking up to these parties!

Friday, March 8, 2013

It's Pinspired Friday! {DIY Color Block T-Shirt}

Alright lovelies, it's Pinspired Friday and I've got a good one for you today...


Color blocking is everywhere...and maybe I'm a little late to the party but dang it, I love the trend and I had to have some color blocking in my life. 

My sister-in-law gave me a whole bag full of t-shirts of all different sizes and colors (thank you!!) and I wanted something NEON. Am I too old for neon? Maybe. But I figured if I mixed some navy it would tone it down a bit and make it age appropriate. I originally wanted to make the bottom blue and the shoulders neon, but there was a logo on the yellow one that would have required a lot more thinking on my part and I wasn't having it. ;)

Here's what inspired this shirt:
Uber Chic for  Cheap: Refashion: DIY Color Block Tees
And yes, this girl is super cute and puts my selfies to shame later on in this post.

Need to have one for yourself? Here is what you'll need.
• 2 T-shirts - 1 of mine (the navy one) was a Hanes "Favorite T" so it was slightly more fitted and had cap sleeves... making it a little easier. The other (the neon one) was a Fruit of the Loom "BEST" shirt (basic shirt... the kind you see screenprinted locations or attractions on.) Both were the same 50% cotton/50% polyester though - which is important for a steady and even stitch when you stitch the two pieces together.

You'll also want:
• A sewing machine
• A bunch of straight pins
• A rotary board, a rotary cutter, and a big ole' ruler. It'll make your life easier than cutting it with scissors, trust me.

Here's my shirts. As I pointed out above, you'll want them to be the same material, and at least similar width wise in size. You can always make bigger smaller, but obviously you can't make smaller bigger. As you can see, I have about 1" or so on each side that is larger than the blue shirt. No worries, we tackle that later. Figure out which one you want on top, and which one on bottom. I picked neon on bottom, navy on top. If you have a logo that lines up with your armpitties, find a different shirt. Logo-less shirts are best for this. Kudos if you buy the same exact shirt in two different colors.

Grab your top shirt. Get it to lay perfect... smoothing wrinkles, making sure seams line up, etc. I used my ruler to make sure the arm pit lines matched up and were straight... important so you don't make an awkward wonky line.


I cut about 2 inches under the armpit. If you want your top half of the shirt to sit a little higher (more on the top of the breast, for example), you can cut it higher, but leave enough to for a seam allowance. Line up your ruler straight and cut.


I cut the bottom shirt about 2 inches under the armpit. Make sure it's straight, smooth and then cut.


You've now got two pieces of shirt, so turn both pieces inside out and start pinning around the parts to be sewn together. Before you start pinning willy nilly, you have to think about seams if your shirt has any (pin the shirt where the seams would normally go), and pay attention that you're pinning the pieces correctly and that the insides of the shirts will be both inside when you turn the shirts back inside out. Make sense? You don't want your top to be correct when you turn it back and your exposed hem to be facing the outside. When you go to pin, start pinning in one armpit region, just in case your shirts don't match up size wise like mine.

My yellow shirt didn't have any seams (score) so I didn't have to worry about where they were, which was good since I have to take that yellow shirt in a bit. Pin around the shirt, and if you're like me, you'll have more of one shirt than the other.

That white-ish piece in the middle left is the yellow shirt. Had to use crappy flash to get the seam to show though.

As you can see, I had too much yellow. So I lined up my excess with the blue seam and then pinned that down the shirt so I could make a new side seam so my fabric would match. NOTE: If you are using the same size shirt, don't worry about this step!!!

Pinning the new side seam... And yes, this means that my shirt will have one side seam. I ain't hatin'.


Now my side is seamed, and the blue and yellow fabric are equal sizes. Yay!
Switch your sewing machine to zig zag stitch. Zig zag stitches will help so the fabric doesn't pull as much when you sew this type of fabric. My machine was set to this stitch, size "3" length, 3 width, 4 tension. Pretty normal tension settings.

Start sewing in one of the armpits. I recommend the one you didn't have to make a new seam on if you can avoid it. If you used the same size shirts, either armpit will do.

Sew around, hit your reverse button to reinforce the beginning stitches... and turn that bad boy back out. You're done!


*deep breath* *awkward selfies...*
.Yes, this is me...and I did not 'shop this picture (even though I wanted to very badly...) 6.8lbs down in this weight loss journey...  and not stopping :)
Luckily, this shirt can shrink right with me. :) I think this'll look cute for spring with some white capri's or skinny jeans with heels like Uber Chic. :)

Update: I tried this shirt this morning with a cardi and necklace :) 


Hope you enjoyed this tutorial! Try it out - I might make another with a navy base and pink top. We'll see! :)

I'm linking up to these parties!

Friday, March 1, 2013

It's Pinspired Friday! {Kale Chips}


It's Pinspired Friday!

Today, I'm going to be talking about Kale chips. It's all started when yesterday at about 3:30 pm, I was starting to get really. really. hungry. The diet is going good... 3.8 pounds (as of this morning) down since we started this on the 27th... so I didn't want to throw all of my progress out the window. I needed something to satisfy that slightly salty, crunchy craving. I took a look at other pinner's ideas and enter...


Now, stay with me here. Kale? Chips? How could basically cabbage taste anything like chips? Well, they don't taste like your sour cream and cheddar chips, no, but kale is a great source of vitamins, nutrients, and it's ultra low in calories. And when you bake the kale, something amazingly awesome happens and it takes on a potato like taste. Plus, a whole bundle of kale is cheap cheap!

"One cup of kale contains 36 calories, 5 grams of fiber, and 15% of the daily requirement of calcium and vitamin B6 (pyridoxine), 40% of magnesium, 180% of vitamin A, 200% of vitamin C, and 1,020% of vitamin K. It is also a good source of minerals copper, potassium, iron, manganese, and phosphorus." - WebMD, The Truth About Kale

 So yay kale! And now you want to try these out for yourself, right??

Here's what you'll need:
• Kale - I used about 3 or so large leaves.
• Olive oil
• Salt (I just used table salt, I imagine sea salt would be pretty tasty too)

You'll also want:
• An oven
• A baking sheet

First, start preheating your oven to 350. Remove the stem and chop up your leaves to small potato chip size. I just cut around the stem and threw it away. Now, with clean hands, drip a little olive oil into your palm (about the size of a quarter.) and rub your leaves all over. Try to coat them all, but don't go overboard with the oil, otherwise they won't crisp up right.


Lay the leaves on your baking sheet in a single layer to ensure even cooking. Then, place the pan in the oven (make sure it's fully preheated to 350!) and cook for 9-10 minutes. You will want to keep an eye on them as all ovens are different. You're watching for that perfect moment where they are crispy, but not brown and burnt. They will take on a bitter taste if they're left in too long too!


Take them out of the oven, sprinkle a little salt on them and enjoy! This ultra low calorie snack is a snap to prepare and they'll get eaten quickly! :)

Thanks for following along and have a great weekend!

Friday, February 22, 2013

It's Pinspired Friday! {3-2-1 Cupcakes in a Cup}

It's time for...


I am visiting my parents this week, and Mama LOC showed me this other alternative "few ingredient dessert", similar to my pumpkin muffins. Like the pumpkin muffins, these cupcakes in a cup have only three ingredients, and even better, a simple recipe formula - 3, 2, 1.

So why is this pinspiring? Is pinspiring even remotely a word? I put this in Pinspired Friday as I have seen very similar recipes on Pinterest, but have never given them a try. I've always wondered how they would taste, and I've always thought they would be a good alternative to a whole bunch of cupcakes that I'd just have to eat. ;) Hopefully, you'll share Mama LOC's recipe on Pinterest too so that others can try out the magical 3-2-1 cupcakes in a cup! :)


Here's what you'll need:
•  A box of angel food cake mix
• A box of funfetti cake mix (or any flavor you like...we like funfetti!)
• Water

You'll also want:
• A microwave
• A mug
• A tablespoon

And... that's it! How easy, cheap and awesome is that?

First, dump your angel food cake  mix and funfetti cake mix into a resealable bowl, and mix the flavors well. You can make a LOT of cupcakes in a cup out of these two mixes so make sure you can put your lid on tight to avoid it spoiling. Now, here's where the 3-2-1 comes in.

3 - add three tablespoons of mix to your mug.
2 - add two tablespoons of water to your mug and mix.
1 - cook for 1 minute in the microwave! (Mama LOC's microwave is older - you may find that 45 seconds will be adequate but 3-2-1 sounds so much better than 3-2-45. ;)

Here is the water and mix before you mix it up...
Cook it up (told you the microwave was old! ;)
And presto! A yummy, easy and low fat treat in less than a minute. Now, if you're like me, the angel food smell threw me off when I took it out of the microwave...but the taste is AWESOME...

And it's even better with a little cream cheese on top! :)

Thanks for following along! :) Let me know how these turned out for you! :)

I'm linking up to:
Showing posts with label easy. Show all posts

Thursday, July 4, 2013

Happy 4th of July and Rhubarb Pie

Hi all and Happy 4th of July! Where has this summer gone?

Around the middle/end of June, I spied that my rhubarb plant had taken off and had given me a bunch of nice, new stems. Both of our rhubarb plants caught some sort of blight-like disease last year and we ended up not having rhubarb very long. So when I saw that the plant (only one came back :( ) had given me enough for a pie... I ran out there with kitchen scissors like a mad man (not really, running with scissors is not recommended. But I did get out there pretty darn quick.)

Now I haven't always been a fan a rhubarb, although like many children, I never gave it a chance either. In our first summer of living here, I gave it a shot and I was hooked. This is the recipe I never waver from because it is that good.

Rhubarb really can shine alone without the help of strawberries or other fruits. When you pack it with enough sugar, it evens out the extreme tart of rhubarb and creates a sweet and slightly tart pie that is really good warm, but even better cold in my opinion... which makes it the perfect pie for picnics.

Ready to make your own? You'll need:
• 4 cups of chopped rhubarb. (This is where I waver only a little... I think I had only about 2 3/4 cups of rhubarb when I was all said and done. This makes for a still tasty pie but 4 cups would definitely make for a thicker pie.) This requires a LOT of stems to get to 4 cups - pictured below is roughly 2 3/4 cup.
• 1 1/3 cups white sugar
• 6 tablespoons all purpose flour
• 1 tablespoon butter (real salted butter, not margarine)
• A 2 pack of premade pie crusts, you'll use both.

You'll also need:
• a pie plate
• a large measuring cup (up to four cup)
• cutting board/knife
• mixing bowl

First, preheat your oven to 450 degrees. Chop the leafs off and the wide bottoms off as well. Make sure to discard the leaves properly, especially if you have pets and small children as they can be quite poisonous if ingested... but the stems are good to go.


Rinse them off, pat them dry. Chop the rhubarb into small slices - the smaller the better, as they'll cook down the best this way.


In a mixing bowl, combine the sugar and flour. In in your pie plate, unroll a pie crust and set in the bottom of the pie plate. The pie plate doesn't require greasing before you put your crust in.


Sprinkle about a 1/4 of your flour and sugar mix on top of the crust. This doesn't have to be exactly 1/4 of your mixture, just eyeball it. Heap the rhubarb on top of the mixture in the pie plate, and then sprinkle the remaining sugar and flour on top of the rhubarb.

Take your tablespoon of butter and chop it into little pieces. Dot the butter randomly on top of the mixture. It should look something like this:


Cover with the remaining crust and pinch the sides together. Make some fancy slices in the top to be...well, fancy. (This actually helps some steam escape, but it looks nice too.)

Place your pie in the oven and bake at 450 for 15 minutes. After 15 minutes has completed, reduce the temperature to 350 and continue baking for 40 to 45 minutes. Do keep an eye on your crust... sometimes I have to place some tinfoil around the edges if they start to brown too much. Serve warm or cold, with vanilla ice cream is the best! :)


Thanks for following along! Have you ever had rhubarb pie? Have you had it before but with strawberries in it? Share your stories in the comments and share this recipe with your friends -- or don't and blow everyone's minds with this amazing recipe at your next picnic! Have a safe and happy 4th of July!


Friday, March 15, 2013

It's Pinspired Friday! {Chocolate Frozen Yogurt}

I say this every week... but really, can you believe it's Friday again? Already? Let's chat about Chocolate Frozen Yogurt today.


If you look at the history of this blog, you know I'm a fan of sweets. As in, I love sugar. Part of this new diet/lifestyle change is really reducing your sugar intake, and he really wants us to stay away from artificial sweeteners. Bob, I love all of your other suggestions...but this one has been toughest for me. Getting rid of soda/pop - fine, we don't drink it anyway (which impressed my dentist yesterday, btw. Lighten up on the pop for smaller waistlines AND better teeth. Go figure). Have an apple a day? Okay, I heart apples so I can do that. But sugar...? Bobbbbbb...*whine*

I know I have to cut it out though if I want to lose anything, so I did. For the most part. We bought Greek yogurt plain, and I have to put a little Splenda in it. It's just too bitter otherwise for me, as in FULL BODY REJECTION to the taste and texture. Blergh. Makes me shiver just thinking about it. 

So when I ran across this pin (actually, I think I pinned it from my sister-in-law. Thanks girl! :) I wanted to give it a try because I really do want to like Greek yogurt. I want to give it a chance and man, did I want some chocolate.

Rich Chocolate Protein FroYo from Muffin-Topless (haha, love that name)
I am happy to report - it wasn't bad. At all. In fact, it was pretty dang good. Of course, I made a few modifications... but they're along the same line and idea as Muffin-Topless.

Want to make some? Here's what you'll need.

• 6 oz. (a little less than a cup... I used about half of the container and it was plenty for Mr. LOC and I to share) of Greek Yogurt, plain.
• 2 Tablespoons of baking cocoa
• 3 packets of Splenda (I didn't have Stevia... and even though I'm only showing 2 packets, it needed 3)
• A dash of vanilla extract

I added the vanilla extract to the recipe, as it was still lacking after mixing up the other ingredients. If you use the vanilla flavored Greek Yogurt, you can omit this step.


Add your Greek yogurt to a bowl. I recommend using glass like Corelle so you don't get that plastic-y taste after you freeze it later. Nothing worse than plastic-y tasting sort-of ice cream (plus, that plastic taste is not good for you!)


Add the 2 tablespoons of baking cocoa, the three packets of Splenda, and the dash of vanilla. Mix thoroughly.

Take out the spoon, cling-wrap it and toss it in the freezer. It's an easy low calorie "dessert" at night!

Hope you enjoy! Let me know how this turned out for you! Spring is just around the corner (thank God). Next week I've got a salad recipe you won't want to miss and another offer for the Etsy store just for my loyal readers! See you then!
I'm linking up to these parties!

Friday, March 8, 2013

It's Pinspired Friday! {DIY Color Block T-Shirt}

Alright lovelies, it's Pinspired Friday and I've got a good one for you today...


Color blocking is everywhere...and maybe I'm a little late to the party but dang it, I love the trend and I had to have some color blocking in my life. 

My sister-in-law gave me a whole bag full of t-shirts of all different sizes and colors (thank you!!) and I wanted something NEON. Am I too old for neon? Maybe. But I figured if I mixed some navy it would tone it down a bit and make it age appropriate. I originally wanted to make the bottom blue and the shoulders neon, but there was a logo on the yellow one that would have required a lot more thinking on my part and I wasn't having it. ;)

Here's what inspired this shirt:
Uber Chic for  Cheap: Refashion: DIY Color Block Tees
And yes, this girl is super cute and puts my selfies to shame later on in this post.

Need to have one for yourself? Here is what you'll need.
• 2 T-shirts - 1 of mine (the navy one) was a Hanes "Favorite T" so it was slightly more fitted and had cap sleeves... making it a little easier. The other (the neon one) was a Fruit of the Loom "BEST" shirt (basic shirt... the kind you see screenprinted locations or attractions on.) Both were the same 50% cotton/50% polyester though - which is important for a steady and even stitch when you stitch the two pieces together.

You'll also want:
• A sewing machine
• A bunch of straight pins
• A rotary board, a rotary cutter, and a big ole' ruler. It'll make your life easier than cutting it with scissors, trust me.

Here's my shirts. As I pointed out above, you'll want them to be the same material, and at least similar width wise in size. You can always make bigger smaller, but obviously you can't make smaller bigger. As you can see, I have about 1" or so on each side that is larger than the blue shirt. No worries, we tackle that later. Figure out which one you want on top, and which one on bottom. I picked neon on bottom, navy on top. If you have a logo that lines up with your armpitties, find a different shirt. Logo-less shirts are best for this. Kudos if you buy the same exact shirt in two different colors.

Grab your top shirt. Get it to lay perfect... smoothing wrinkles, making sure seams line up, etc. I used my ruler to make sure the arm pit lines matched up and were straight... important so you don't make an awkward wonky line.


I cut about 2 inches under the armpit. If you want your top half of the shirt to sit a little higher (more on the top of the breast, for example), you can cut it higher, but leave enough to for a seam allowance. Line up your ruler straight and cut.


I cut the bottom shirt about 2 inches under the armpit. Make sure it's straight, smooth and then cut.


You've now got two pieces of shirt, so turn both pieces inside out and start pinning around the parts to be sewn together. Before you start pinning willy nilly, you have to think about seams if your shirt has any (pin the shirt where the seams would normally go), and pay attention that you're pinning the pieces correctly and that the insides of the shirts will be both inside when you turn the shirts back inside out. Make sense? You don't want your top to be correct when you turn it back and your exposed hem to be facing the outside. When you go to pin, start pinning in one armpit region, just in case your shirts don't match up size wise like mine.

My yellow shirt didn't have any seams (score) so I didn't have to worry about where they were, which was good since I have to take that yellow shirt in a bit. Pin around the shirt, and if you're like me, you'll have more of one shirt than the other.

That white-ish piece in the middle left is the yellow shirt. Had to use crappy flash to get the seam to show though.

As you can see, I had too much yellow. So I lined up my excess with the blue seam and then pinned that down the shirt so I could make a new side seam so my fabric would match. NOTE: If you are using the same size shirt, don't worry about this step!!!

Pinning the new side seam... And yes, this means that my shirt will have one side seam. I ain't hatin'.


Now my side is seamed, and the blue and yellow fabric are equal sizes. Yay!
Switch your sewing machine to zig zag stitch. Zig zag stitches will help so the fabric doesn't pull as much when you sew this type of fabric. My machine was set to this stitch, size "3" length, 3 width, 4 tension. Pretty normal tension settings.

Start sewing in one of the armpits. I recommend the one you didn't have to make a new seam on if you can avoid it. If you used the same size shirts, either armpit will do.

Sew around, hit your reverse button to reinforce the beginning stitches... and turn that bad boy back out. You're done!


*deep breath* *awkward selfies...*
.Yes, this is me...and I did not 'shop this picture (even though I wanted to very badly...) 6.8lbs down in this weight loss journey...  and not stopping :)
Luckily, this shirt can shrink right with me. :) I think this'll look cute for spring with some white capri's or skinny jeans with heels like Uber Chic. :)

Update: I tried this shirt this morning with a cardi and necklace :) 


Hope you enjoyed this tutorial! Try it out - I might make another with a navy base and pink top. We'll see! :)

I'm linking up to these parties!

Friday, March 1, 2013

It's Pinspired Friday! {Kale Chips}


It's Pinspired Friday!

Today, I'm going to be talking about Kale chips. It's all started when yesterday at about 3:30 pm, I was starting to get really. really. hungry. The diet is going good... 3.8 pounds (as of this morning) down since we started this on the 27th... so I didn't want to throw all of my progress out the window. I needed something to satisfy that slightly salty, crunchy craving. I took a look at other pinner's ideas and enter...


Now, stay with me here. Kale? Chips? How could basically cabbage taste anything like chips? Well, they don't taste like your sour cream and cheddar chips, no, but kale is a great source of vitamins, nutrients, and it's ultra low in calories. And when you bake the kale, something amazingly awesome happens and it takes on a potato like taste. Plus, a whole bundle of kale is cheap cheap!

"One cup of kale contains 36 calories, 5 grams of fiber, and 15% of the daily requirement of calcium and vitamin B6 (pyridoxine), 40% of magnesium, 180% of vitamin A, 200% of vitamin C, and 1,020% of vitamin K. It is also a good source of minerals copper, potassium, iron, manganese, and phosphorus." - WebMD, The Truth About Kale

 So yay kale! And now you want to try these out for yourself, right??

Here's what you'll need:
• Kale - I used about 3 or so large leaves.
• Olive oil
• Salt (I just used table salt, I imagine sea salt would be pretty tasty too)

You'll also want:
• An oven
• A baking sheet

First, start preheating your oven to 350. Remove the stem and chop up your leaves to small potato chip size. I just cut around the stem and threw it away. Now, with clean hands, drip a little olive oil into your palm (about the size of a quarter.) and rub your leaves all over. Try to coat them all, but don't go overboard with the oil, otherwise they won't crisp up right.


Lay the leaves on your baking sheet in a single layer to ensure even cooking. Then, place the pan in the oven (make sure it's fully preheated to 350!) and cook for 9-10 minutes. You will want to keep an eye on them as all ovens are different. You're watching for that perfect moment where they are crispy, but not brown and burnt. They will take on a bitter taste if they're left in too long too!


Take them out of the oven, sprinkle a little salt on them and enjoy! This ultra low calorie snack is a snap to prepare and they'll get eaten quickly! :)

Thanks for following along and have a great weekend!

Friday, February 22, 2013

It's Pinspired Friday! {3-2-1 Cupcakes in a Cup}

It's time for...


I am visiting my parents this week, and Mama LOC showed me this other alternative "few ingredient dessert", similar to my pumpkin muffins. Like the pumpkin muffins, these cupcakes in a cup have only three ingredients, and even better, a simple recipe formula - 3, 2, 1.

So why is this pinspiring? Is pinspiring even remotely a word? I put this in Pinspired Friday as I have seen very similar recipes on Pinterest, but have never given them a try. I've always wondered how they would taste, and I've always thought they would be a good alternative to a whole bunch of cupcakes that I'd just have to eat. ;) Hopefully, you'll share Mama LOC's recipe on Pinterest too so that others can try out the magical 3-2-1 cupcakes in a cup! :)


Here's what you'll need:
•  A box of angel food cake mix
• A box of funfetti cake mix (or any flavor you like...we like funfetti!)
• Water

You'll also want:
• A microwave
• A mug
• A tablespoon

And... that's it! How easy, cheap and awesome is that?

First, dump your angel food cake  mix and funfetti cake mix into a resealable bowl, and mix the flavors well. You can make a LOT of cupcakes in a cup out of these two mixes so make sure you can put your lid on tight to avoid it spoiling. Now, here's where the 3-2-1 comes in.

3 - add three tablespoons of mix to your mug.
2 - add two tablespoons of water to your mug and mix.
1 - cook for 1 minute in the microwave! (Mama LOC's microwave is older - you may find that 45 seconds will be adequate but 3-2-1 sounds so much better than 3-2-45. ;)

Here is the water and mix before you mix it up...
Cook it up (told you the microwave was old! ;)
And presto! A yummy, easy and low fat treat in less than a minute. Now, if you're like me, the angel food smell threw me off when I took it out of the microwave...but the taste is AWESOME...

And it's even better with a little cream cheese on top! :)

Thanks for following along! :) Let me know how these turned out for you! :)

I'm linking up to:

Labels

Flickr Images

Like us on Facebook

Popular Posts


Little Oak Creations Template by Ipietoon Cute Blog Design

Blogger Templates